Cloud Workloads are becoming increasingly hybridized over time. Some companies do not want to be tied to a single cloud provider for cost, feature set, or disaster recovery, but many times the reasons for hybrid cloud workloads is simply logistical. We recently had a customer whose entire CI/CD pipeline ran in Azure DevOps. The customer wanted to run AWS workloads, but retain their mature workflows in Azure. Granted, we could have ported over all of their environments and pipelines and code bases into a native AWS service such as AWS CodeBuild, CodeDeploy, and CodeCommit, however, this would require considerable overhead of not only building out the aforementioned resources but also training developers to alter their workflows and testing the new resources. We opted instead to leverage their current CI/CD pipeline in Azure Devops against new AWS resources while making a few quality of life improvements along the way.
In this article you will create a basic Autoscaling setup with EC2 instances, create an Azure Environment and Pipeline, configure Userdata scripts to join EC2 instances to the Azure Devops Environment automatically. Before you dive into the procedure, you'll need to create Azure and AWS accounts. To get your accounts up and running you’ll need to provide email and billing information for your respective accounts.
Procedure
- Create AutoScaling Group with EC2 instances (Create a Load Balancer in front of your EC2 Autoscaling group, Optional: create a UserData script to change the hostname (this is what will appear in the Azure Devops Pipeline Environment))
- Create Azure DevOps Pipelines
- Integrate AWS plugins with Azure
- Create Personal access token with updated expiration date
- Create a Environment
- Retrieve the Azure Devops Environment Join script (Create UserData file using this script as a template)
- Optional: Create a Azure Devops Pipeline proxy in EC2 to access private non-EC2 or RDS resources
- Test your Azure Pipeline to deploy code to your Autoscaled EC2 Instances
Procedure Details
Step 1.
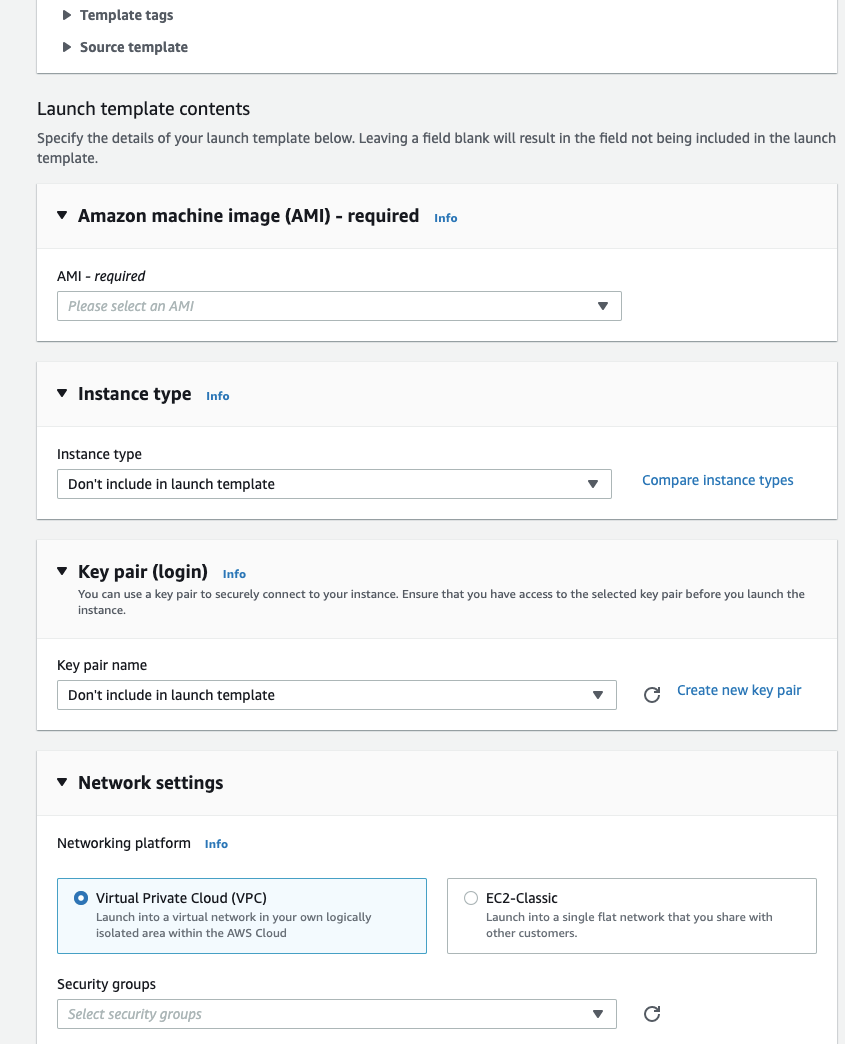
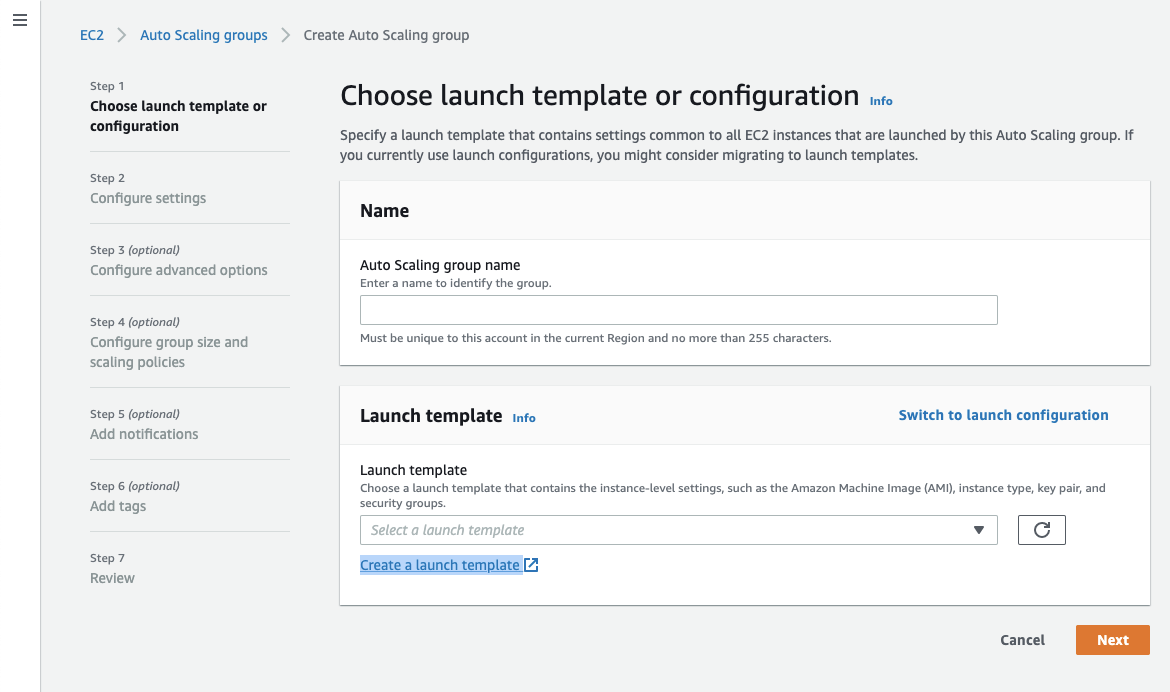
Create all the necessary resources for a fully integrated AutoScaling Group. This includes a Launch Configuration/Template, AutoScaling Group, Elastic Load Balancer, Target Group, Listeners, and Security Groups. You will need to add a UserData Script to join the Azure DevOps Environment (more on this later). See here for more details.
Step 2.
Create an Azure DevOps Pipeline. The procedure is documented in more detail here. In brief, the procedure is as follows:
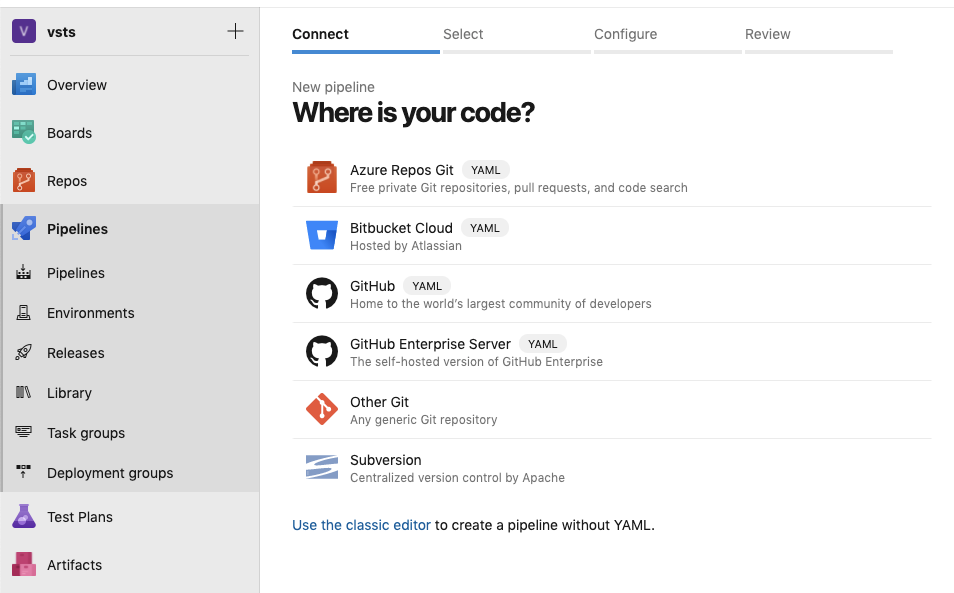
- Sign in to your Azure DevOps organization and navigate to your project.
- Go to Pipelines, and then select New Pipeline.
- Walk through the steps of the wizard by first selecting GitHub as the location of your source code.
- You might be redirected to GitHub to sign in. If so, enter your GitHub credentials.
- When the list of repositories appears, select your repository.
- You might be redirected to GitHub to install the Azure Pipelines app. If so, select Approve & install.
When the Configure tab appears, select Python package. This will create a Python package to test on multiple Python versions.
- When your new pipeline appears, take a look at the YAML to see what it does. When you're ready, select Save and run.
- You're prompted to commit a new azure-pipelines.yml file to your repository. After you're happy with the message, select Save and run again.
- If you want to watch your pipeline in action, select the build job.
- You just created and ran a pipeline that we automatically created for you, because your code appeared to be a good match for the Python package template.
- You now have a working YAML pipeline (azure-pipelines.yml) in your repository that's ready for you to customize!
- When you're ready to make changes to your pipeline, select it in the Pipelines page, and then Edit the azure-pipelines.yml file.
Step 3.
- Go to the Extensions for Azure DevOps Visual Studio Marketplace and search for AWS Toolkit for Azure DevOps. (The following URL is a direct link to the AWS Toolkit for Azure DevOps: https://marketplace.visualstudio.com/items?itemName=AmazonWebServices.aws-vsts-tools.)
- Choose Get it free and sign in to your Azure DevOps account, if prompted.
- Choose Install to install the toolkit into your Azure DevOps account, or choose Download to install it on an on-premises server.
Step 4.
Create a personal access token and update the expiration date. Details here.
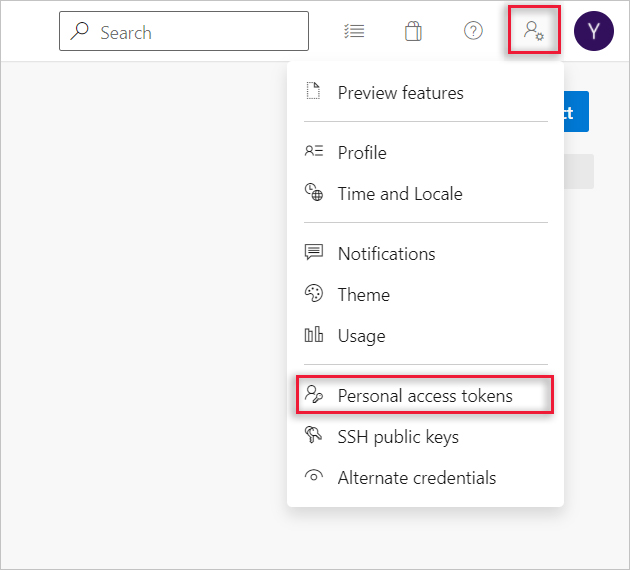
- From your home page, open your user settings, and then select Personal access tokens.
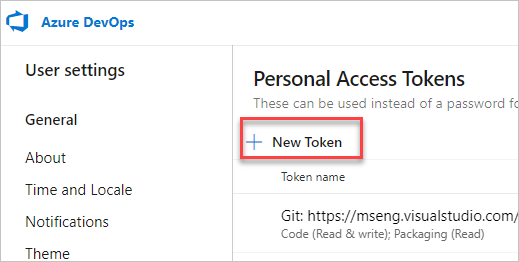
- And then select + New Token.
3. Name your token, select the organization where you want to use the token, and then choose a lifespan for your token.
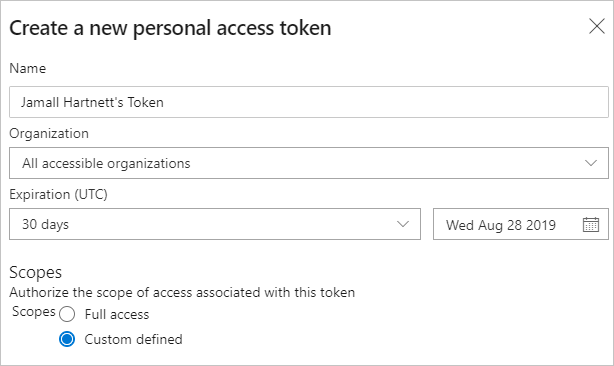
4. Select the scopes for this token to authorize for your specific tasks. For this exercise we will use Full Access, however this is not recommended in a production setting.
5. When you're done, make sure to copy the token. For your security, it won't be shown again. Use this token as your password.
Step 5.
In our customers' previous setup, every target machine, in this case a virtual machine running Windows Server with IIS installed, needed to be manually added to the appropriate environment. The pipeline would then be configured to target this environment of Azure VMs. In our new configuration, our EC2 instances would replace these Azure VMs by way of an AutoScaling Group. This ASG would spin up new EC2s instances which would then run a UserData script to bootstrap the necessary software as well as join the appropriate environment in Azure using a modified agent install script.
Every target machine in the environment requires an installed build and release agent. You can do this using the script in the environments tab of Azure Pipelines. You can choose the type of agent to suit the target operating system and platform; such as Windows and Linux. This can be done manually, but for this exercise we will be taking a copy of the agent installation script, modifying it with some variables such as our Azure Account Name, Personal Access Token, and environment Name, then integrating this into our Userdata so that any new EC2 instances which are launched will automatically join our Azure Devops environment. We can then deploy our code to instances in this AutoScaling Group. Details here.
Step 6.
Now it is time to retrieve the Agent In Installation Script and modify it so that it runs in the Userdata script of our Launch Configuration. Here is an example, note the bolded variables:
<powershell>
echo "Attempting to join Azure Environment"
$ErrorActionPreference="Stop";If(-NOT ([Security.Principal.WindowsPrincipal][Security.Principal.WindowsIdentity]::GetCurrent() ).IsInRole( [Security.Principal.WindowsBuiltInRole] "Administrator")){ throw "Run command in an administrator PowerShell prompt"};If($PSVersionTable.PSVersion -lt (New-Object System.Version("3.0"))){ throw "The minimum version of Windows PowerShell that is required by the script (3.0) does not match the currently running version of Windows PowerShell." };If(-NOT (Test-Path $env:SystemDrive\'azagent')){mkdir $env:SystemDrive\'azagent'}; cd $env:SystemDrive\'azagent'; for($i=1; $i -lt 100; $i++){$destFolder="A"+$i.ToString();if(-NOT (Test-Path ($destFolder))){mkdir $destFolder;cd $destFolder;break;}}; $agentZip="$PWD\agent.zip";$DefaultProxy=[System.Net.WebRequest]::DefaultWebProxy;$securityProtocol=@();$securityProtocol+=[Net.ServicePointManager]::SecurityProtocol;$securityProtocol+=[Net.SecurityProtocolType]::Tls12;[Net.ServicePointManager]::SecurityProtocol=$securityProtocol;$WebClient=New-Object Net.WebClient; $Uri='https://vstsagentpackage.azureedge.net/agent/2.186.1/vsts-agent-win-x64-2.186.1.zip';if($DefaultProxy -and (-not $DefaultProxy.IsBypassed($Uri))){$WebClient.Proxy= New-Object Net.WebProxy($DefaultProxy.GetProxy($Uri).OriginalString, $True);}; $WebClient.DownloadFile($Uri, $agentZip);Add-Type -AssemblyName System.IO.Compression.FileSystem;[System.IO.Compression.ZipFile]::ExtractToDirectory( $agentZip, "$PWD");.\config.cmd --environment --environmentname "${azure_env}" --agent $NewName --runasservice --work '_work' --url 'https://dev.azure.com/${azure_org}/' --projectname '${azure_proj}' --auth PAT --token ${azure_pat} --unattended; Remove-Item $agentZip;
</powershell>
Our Terraform script will render this userdata script and add it to the launch configuration. Our Terraform Module includes required variables such that we can define what Azure Environment, Organization, Project and Access tokens to which we are deploying.
Step 7. (Optional)
Given the way Azure Devops environments work, it is possible to use practically any Virtual Machine provided that this VM can reach out to the public internet to receive the agent package files and communicate with Azure Devops Pipelines. In our implementation, our EC2 instances reside in private subnets with NAT Gateways. But, what if you have a private resource such as an RDS instance where you do not have access to the underlying Operating System with which to install the agent, or your resources reside in a restricted subnet without access to the internet? In this case you would need to deploy a self-hosted Azure DevOps agent in an EC2 instance that has access to your RDS instance. More Details here. Effectively what this means is that instead of your pipeline executing in a Azure hosted VM, you can instead execute your pipeline in a VM of your choosing, in our case, a proxy EC2 instance which resides in the aforementioned private subnet with NAT Gateway access to communicate with Azure DevOps.
Step 8.
Now we will do a test run of deploying our code to our AutoScaled EC2 instances. We can simply increase the Desired number of instances in our AutoScaling group.

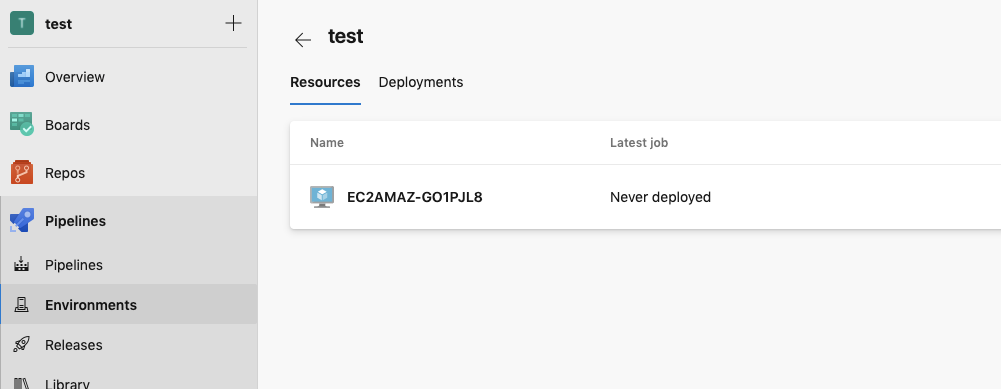
As our EC2 instances come into service they will now join the Azure Devops Environment:
We can now execute a pipeline with our EC2 instance(s) as targets.
Summary:
We’ve created a set of AWS resources including a fleet of EC2 instances that integrate with an Azure Devops Pipeline. We created a long lasting Personal Access token along with a customized Environment Join script so that EC2 instances seamlessly join an Azure Devops environment which is run via the Userdata script in our Launch Template.
FAQ
How does integrating AWS resources with Azure DevOps pipelines affect version control practices, especially when teams are accustomed to Azure Repos or GitHub?
Integrating AWS resources with Azure DevOps pipelines enriches version control by seamlessly integrating with Azure Repos or GitHub. This ensures no disruption to existing workflows and enables a unified approach to CI/CD across cloud environments.
What specific security considerations should be considered when linking AWS resources with Azure DevOps, particularly regarding access permissions for deployment?
Security considerations for linking AWS resources with Azure DevOps focus on meticulous management of access keys and permissions. Employing AWS Identity and Access Management (IAM) roles to control deployment permissions ensures secure and restricted access to AWS resources.
Are there any scalability concerns or limits in the number of AWS resources that can be managed through Azure DevOps pipelines, especially for large-scale projects?
Scalability concerns or limits in managing AWS resources through Azure DevOps pipelines are addressed by leveraging Azure DevOps’ scalability features, allowing for efficient management of numerous AWS resources, with considerations for project complexity and resource demands to ensure optimal performance and management at scale.