One of the most valuable features within AWS’s ecosystem is auto scaling of Instances to meet your web traffic needs. At Mission we have developed these types of systems for our customers. This blog post will attempt to expand upon what was a very informative article about configuring Chef to run in an autoscaling group. You can find the original article here.
Using Chef with autoscaling is handy because it lets you update your autoscaling group without having to bake new AMIs. Additionally new server configurations or application software can be deployed using Chef without the need to build new AMIs or change cloud formation configurations.
While you can run Chef on a completely vanilla instance configuration this is most likely undesirable since it can take up to 10-15minutes for Chef to finish configuring the system with each server instantiation. Instead we use “pre-baked” instances that have been created using the desired Chef role and converting them into AMIs. When using one of these AMIs the Chef run on the instances goes a lot faster because it’s running Chef for the 2nd time instead of the first. This meets two important needs. 1. It speeds up the Chef run and hence the launch process. And two it allows you to get the latest version of the Chef role at boot time.
The components
In order to achieve the goal of a fully automated auto scaling group you will need to configure the following services:
- Setup an AWS account with Amazon.
- Setup a hosted Chef account with Opscode or use private Chef or open-source Chef server.
What cloud formation does in plain English
Before going through the actual configuration and explaining each item in detail let’s go over what the cloud-formation will actually do.
This cloud formation configuration will create the various AWS configurations that will enable the automatic launching and decommissioning of servers in a defined auto-scaling group.
In the most basic terms the cloud-formation configuration will create a user in AWS which will control the launching and decommissioning of the servers, allow that user to access an S3 bucket which contains scripts and keys. Then it will create the host keys, define which AMIs are used and create the necessary Security groups. With regards to the autoscaling itself it will create a launch configuration that will be used to configure Chef to run at instance launch. Then autoscaling policies will be created to launch and decommission servers based upon the CPU utilization. An ELB will be created for your auto-scaling group. And finally an SNS topic will be created so you get emails about the events that occur once your autoscaling group is created. Okay let’s dig into the details.
Putting it all together
Cloud-formation configuration. You can find the entire cloud-formation configuration here.
NOTE: I have sanitized the configuration so you will have to input AMI ids, correct SSL keys etc.
Additionally you can read the details of cloud formation documentation here.
Cloud formation configuration files consist of the following: Elements, Description, Parameters, Mappings, Resources and Outputs. I will describe each in turn.
Description: self-explanatory.
https://gist.github.com/3759633.js
Parameters
The parameters section enables you to input variables into your stack at creation time. Parameters allow you to change your instance size, SNS topic email address, and various Chef parameters such as Organization, Environment and most importantly the Chef run list.
https://gist.github.com/3928545.js
Looking at the parameters portion of the configuration one notices that here is where you enter in the information to your hosted Chef configuration.
ChefOrganization = Your hosted Chef organization. (e.g Mission)
ChefEnvironment = The Chef environment you want your instance in. (e.g Production)
ChefRunList = The Chef role or run_list for your auto scaling instances. (e.g. for our example app_server_prod role)
DomainName = The domain name you want to pass to the server’s boot strap configuration. This will be covered later in the resources section.
ChefServerPrivateKeyBucket = The S3 bucket where various sensitive information such as validation keys to access hosted Chef are stored (e.g. Mission_bucket).
SNSTopic = The email address you want to allow SNS to send notifications to when instances are scaled up or down in the auto-scaling pool (e.g. sns@missioncloud.com).
Mappings
Mappings allow you to create key-value pairs that are used throughout a cloud-formation configuration. The most common use is to create a mapping of AWS regions and AMIs. Here you can see we are mapping various AMIs to their respective Regions. This is where you place the specific AMIs you want to use for your cloud configuration. In order to speed up the Chef runs at launch we create AMIs from a server with the specific role and then use those as a starting point for the auto-scaling group. This way prerequisites of the role are already loaded and the Chef runs can dramatically reduce from 10-15 minutes down to 5 minutes or less.
https://gist.github.com/3759703
Resources
Resources are now the meat of the cloud configuration file. Here you will define the various AWS resources you need to instantiate and configure in order to make a working auto scaling group.
IAM Access Key
First you’ll need to define an IAM User policy so that this user can download sensitive configuration information from our S3 bucket defined in parameters above.
https://gist.github.com/3759720
Host Keys
Now we create an IAM access key to allow your newly created Chef client user access to your servers.
https://gist.github.com/3759729
S3 Bucket Policy
Here we create an S3 Bucket Policy that will allow the newly created IAM user access to download our keys and other necessary items.
https://gist.github.com/3759732
SNS Topic
In order to get visibility into what’s going on with our auto scaling group we will need to setup an SNS Topic in order to get emails when events occur. To do this we create an SNS topic and reference the email address we setup in the parameters section.
https://gist.github.com/3759806
Auto Scaling Group
Now we get to setup the actual Auto Scaling Group. Here we have named the Group AppServerGroup and have defined what availability zones it will use (in this call all), what the launch configurations is and what load balancers are to be used.
Additionally we set the minimum and maximum number of servers for the group. We also set up various notification events that will be sent to our SNS topic.
https://gist.github.com/3928588
Auto Scaling Launch Configuration
Each auto scaling group needs to have a launch configuration, which is simply the configuration used when launching new instances within the group. For our purposes we are bootstrapping a Chef client using Amazon’s launch configuration APIs.
With the launch configuration we are selecting our AMI, launching it as an instance, applying our defined security groups and then bootstrapping Chef on the server by installing the various OS packages, ruby gems, and configuration files that Chef requires to run properly on the server. If you use a pre-configured Chef enabled AMI then many of these items configurations are unnecessary. (ie the ruby gems are already installed etc.).
The launch configuration is broken down into Metadata and Properties components. I will go through each in turn.
We define the LaunchConfiguration and name it ChefClient in the json configuration.
Metadata
First we define the metadata portion of the configuration.
https://gist.github.com/3970769
Here we tell cloud formation to install various apt and ruby gem packages that are necessary for Chef to run. Some of these or all of them may already be installed depending upon whether or not the AMI is already loaded with these specific packages.
Next we load some configuration files for Chef to run properly. These files then will take inputs from the Parameters we discussed above.
Lastly we load an ohai plugin which will capture cloud formation information for Chef.
Properties
The next portion of the launch configuration is the properties section.
https://gist.github.com/3970766
Here we define the SecurityGroups, ImageID, InstanceType and KeyName. All these items are defined either in the parameters section or resource section of the configuration. Straightforward.
The most complex part of this configuration is the UserData section. User Data is part of Amazon’s Meta Data that is used with all AMIs and allows users to run scripts and send information to each instance.
In our configuration we have additional scripts that need to run to configure the system to configure and run Chef. In our configuration we update our apt repository and upgrade the system to the latest version of Ubuntu. Then remove some unnecessary packages and install Amazon’s cloud formation bootstrap scripts. Then we download the Chef-init.rb script from S3 and run it to set the hostname of the server, configure the client.rb file and add a shutdown script to remove the server from Chef when it’s terminated.
Below is the script that configures Chef on the server.
https://gist.github.com/3970735
Then we download the appropriate validation.pem and encrypted_data_bag_secret from S3 to finish the configuration of Chef.
Once everything is configured we run Chef on the server and create a wait condition to give Chef 20minutes to run.
EC2 Security Group
Here we define the security group which the instances will utilize. Pretty straight forward.
https://gist.github.com/3759844
Elastic Load Balancer
Here we define the load balancer configuration that will be used as part of the auto scaling group. Notice you can add your SSL keys to the configuration as well.
https://gist.github.com/3928592
Auto Scaling Policies
Here we define the scale up and scale down policies. Basically we define the adjustment type “ChangeInCapacity”, cooldown period and scaling adjustment which in our case is one instance at a time.
https://gist.github.com/3759856
The scale down policy is the same except that we are deleting one instance at a time (-1)
https://gist.github.com/3759864
Cloud Watch Alarms
Now that we’ve defined a scale up and scale down policy we need to define when we are going to scale up or down. Cloud Watch alarms monitor cloud watch data we define and will then scale up or down instances as necessary.
Here we define a high alarm. With this CPUAlarmHigh resource we are telling EC2 to add an additional server once the combined CPU of all instances in the auto scaling group is above 75% utilized for at least 10 minutes.
https://gist.github.com/3759868
A second CloudWatch Alarm is defined that will remove instances from the auto scaling pool once the CPU utizliation is below 75% for at least 10minutes.
https://gist.github.com/3759875
Cloud Formation Wait Condition Handle and Cloud Formation Wait Condition
Lastly we need to configure the cloud formation wait condition handles and wait conditions. These are standard handles that cloud formation utilizes in order to wait for other processes to complete, specifically Chef-client. Here we are creating at 20 minute wait handle so any processes outside of cloud formation can complete their operations with time to spare.
https://gist.github.com/3759883
Outputs
Outputs are used to present the user of cloud formation information that is generated by the cloud formation script. We have little need for this but you can read more about outputs for your specific implementation here.
Launching the Cloud Formation configuration
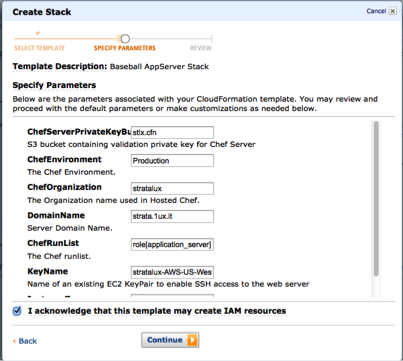
Now that you have the cloud formation configuration in place for your specific Chef role you can now utilize the AWS console to launch the instance.
Select your region and push the create new stack button.

You can either load your template from your file system or store it in an S3 bucket.

Now you can input in your specific parameters. This is where you configure Chef and select the role you want to use.
Once you launch the configuration you can watch cloud formation create each of the various components. If something fails you will notice it here and be able to drill down to where the problem is.
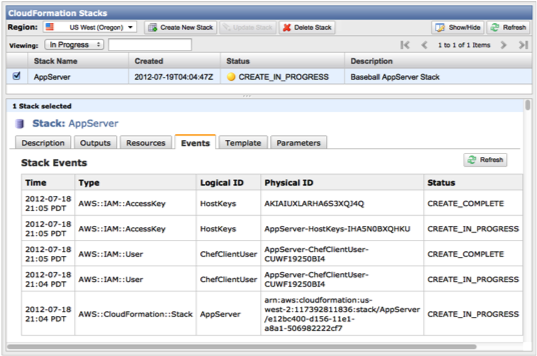
If everything works correctly then you will see a CREATE_COMPLETE status for your specific stack. You are now done and have a successful application server pool powered by AWS and Chef!