We recently had a customer, who we’ll call Customer X, that is currently running their application in Microsoft Azure. In this article, we’ll walk through how Customer X tasked Mission to create a proof of concept environment to validate the required feature set and performance in AWS. The Customer provided an IoT service using telemetry devices. Their technology stack included an Azure Service Fabric Cluster with auto-scaling, CLI cluster management tools, integration with Azure DevOps service for application deployments, a Kafka cluster, and Azure EventHub Monitoring. Additionally, Customer X directed Mission to stress test said proof-of-concept environment and ensure that, at minimum, it would support five thousand messages per second and the system could process any given message in under 100 milliseconds with a p99 of 10 milliseconds. Customer X also provided the stretch goal of developing a mechanism for delivering all telemetry data to Amazon S3 for later analysis which Mission achieved.
Key Goals
- Duplicate infrastructure and Feature Parity of Microsoft Azure Service Fabric managed service
- Integrate Service Fabric (SF) cluster with Azure DevOps
- Test IoT Core/Lambda ingestion to SF Cluster
- Design a simulator to generate at least 5,000 messages per second
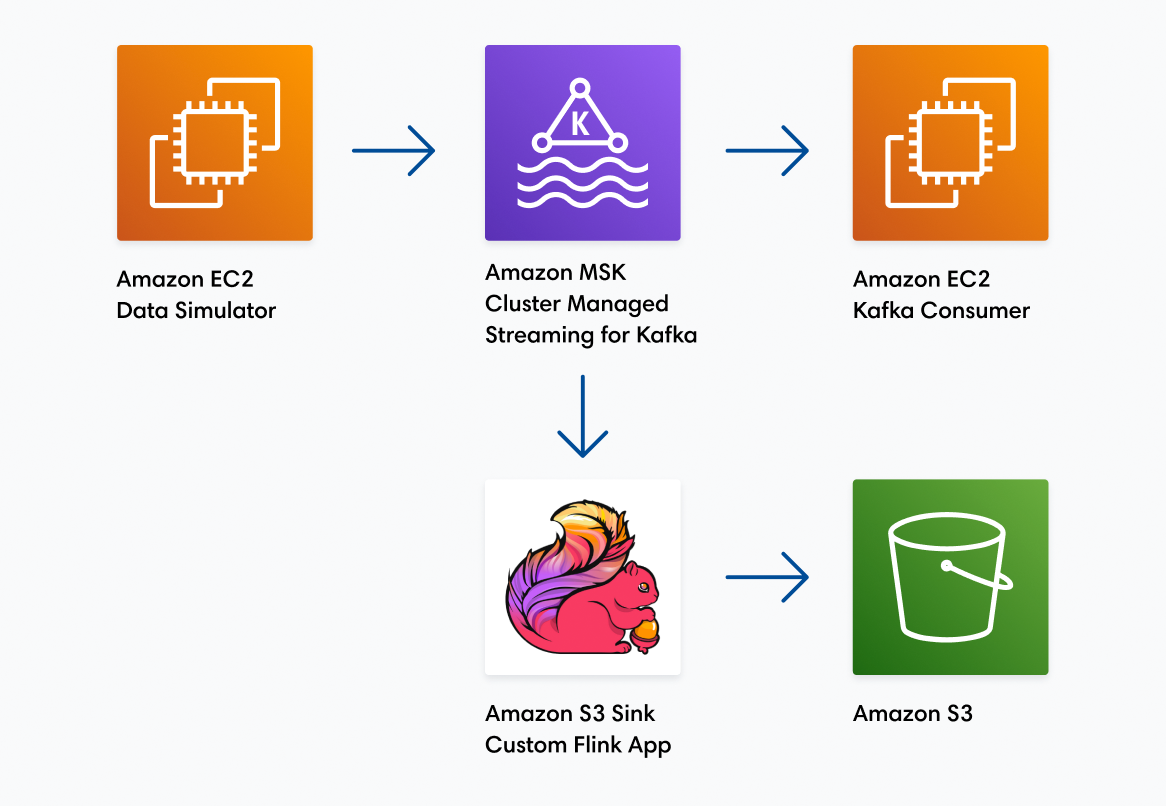
- Asynchronously deliver simulator data to Amazon S3
Mission approached this project from a multi-phase perspective.
- Assess and identify suitable “IoT Gateway” options on AWS for Customer X’s platform. (This included evaluating AWS’ streaming data services including Amazon Kinesis, Amazon MSK, AWS IoT Core, AWS Lambda)
- Deploy Infrastructure to host Service Fabric cluster
- Build mechanisms to dynamically autoscale cluster nodes
- Validate Amazon EC2 hosted Service Fabric featureset compared to Azure Hosted Service Fabric (DevOps, Monitoring, Scaling)
- Stress Test data ingestion with rigid requirements (5k messages/sec, 100 millisecond limit)
- Evaluate and test Amazon Kinesis Analytics Application (Java) for data delivery to Amazon S3
Challenges:
- Message volume and throughput
- Application build/deploy integration with Azure DevOps
- Scripting procedures to handle upscaling and downscaling of nodes
- Simulator refactoring
Back to Basics - Infrastructure
Azure Service Fabric is a distributed systems platform that makes it easy to package, deploy, and manage scalable and reliable microservices and containers. In short, it's Microsoft’s answer to Kubernetes.
The infrastructure required to run Service Fabric was very straightforward. A number of Amazon EC2 instances to host the SF nodes, Amazon EFS for shared storage, a Network Load Balancer to serve web requests and accept management API requests via API Endpoint (theoretically, the management portion should be separated out into its own internal NLB, but this was out of scope), an AutoScaling group to manage nodes, and Amazon CloudWatch for basic monitoring.
Microsoft has a very well-documented process for Deploying Service Fabric onto Amazon EC2 instances. In essence, once stood-up, Amazon EC2 hosted “seed nodes” will run a PowerShell script on the “master” node (any Amazon EC2 will do) that will download the Service Fabric installation files, install the application, then remotely install Service Fabric onto the other seed nodes to create the cluster. The tricky part here is that the PowerShell script requires the private IPs of the Amazon EC2 nodes. To get around this limitation Mission wrote a python script using boto3 to query Amazon EC2 instances based on tags, then look up the private IPs, and finally build out a json configuration document.
This script also tagged our instances with the “nodename” assigned by Service Fabric, which was crucial for autoscaling, but we’ll get to that later.
Once Service Fabric was installed on the initial fleet of Amazon EC2s and they’ve successfully joined the cluster the user should be able to navigate to the Service Fabric Management Portal via a web browser.
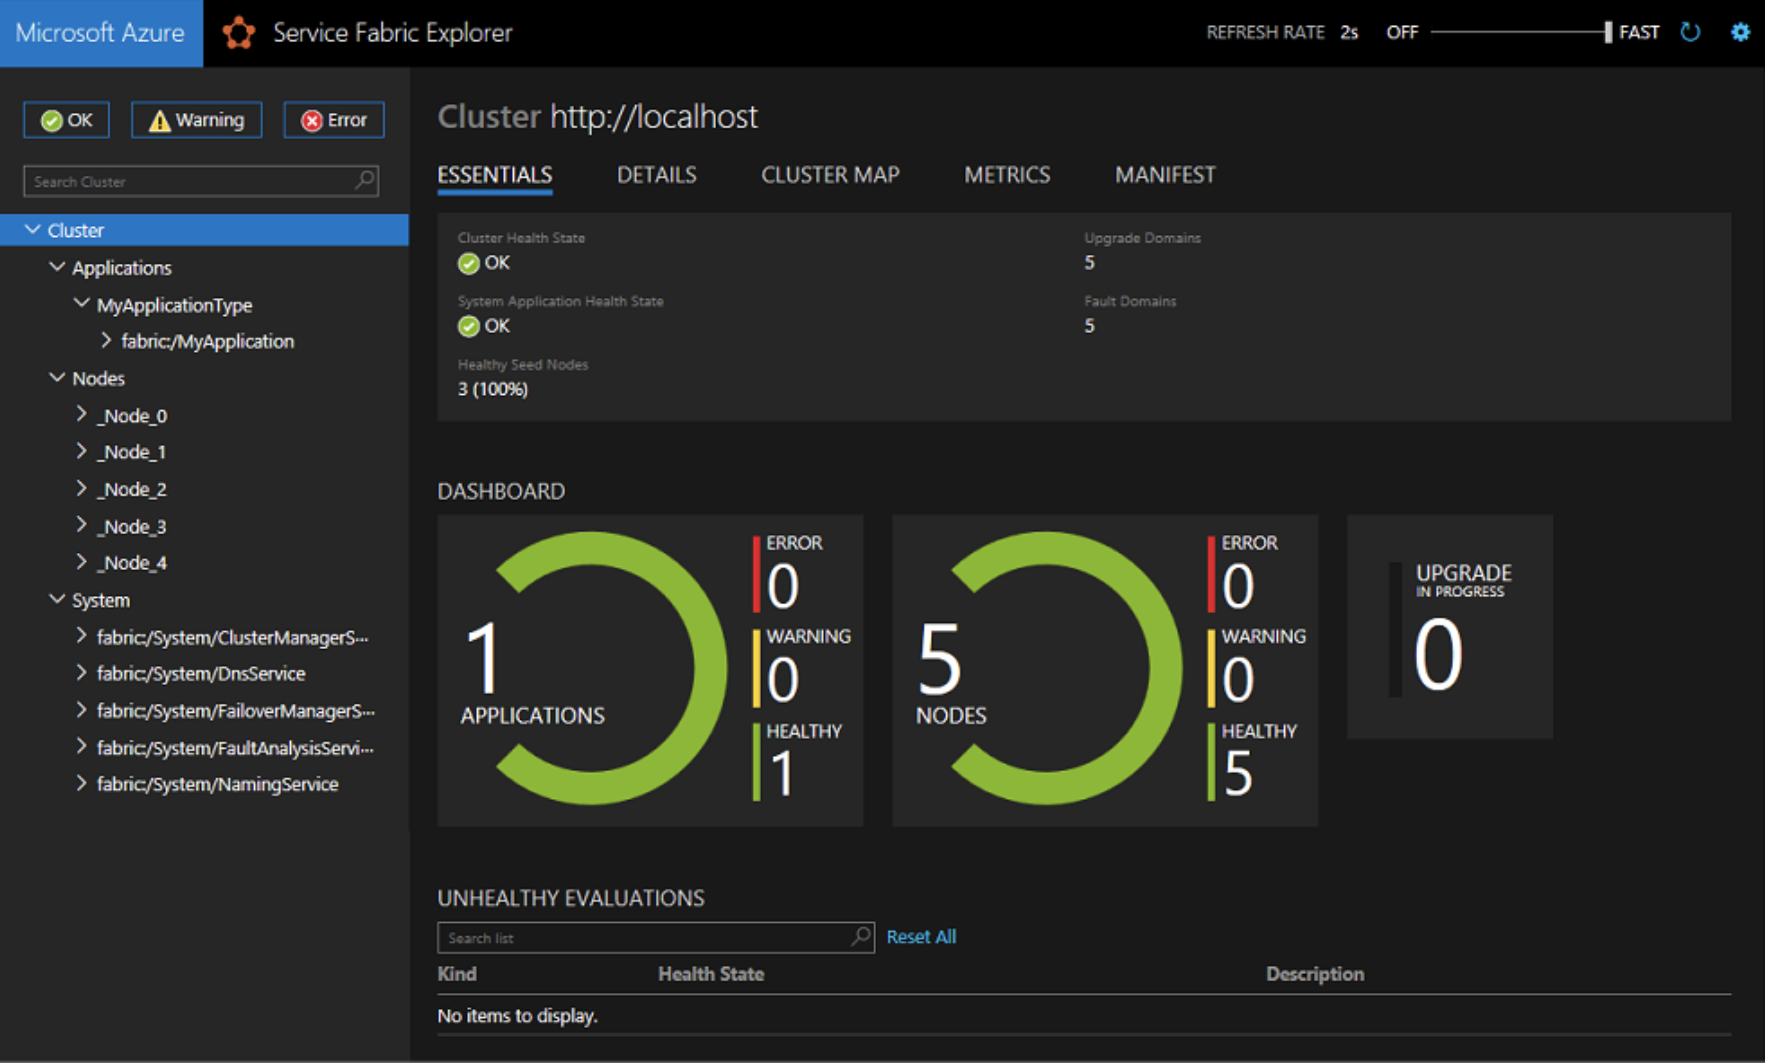
Any nodes that were part of the initial deployment will be appended with (Seed Node). This is a critical distinction, because Service Fabric requires that Seed Nodes remain static in order to maintain the integrity of the cluster. More “non-seed” nodes can be added or removed on demand but these Seed Nodes must remain. This will be important when considering scaling.
Feature Parity
Scaling
As one can imagine, Customer X had a laundry list of mission critical features that needed to be vetted and validated before they would even consider a migration from Azure to AWS. Many of those features were standard out of the box functionality of Service Fabric including Stateful Services (data layer), Reliable Actor Model (processes or threads), and Remote Process Calls (intra-application data referencing). These were quite well documented and easy to demonstrate using Microsoft’s Getting Started code repository.
Other features such as dynamically auto-scaling Service Fabric nodes needed to be developed from whole cloth. In essence, Mission had to reverse engineer Microsoft’s Service Fabric Managed Service.
Autoscaling was a significant challenge. On the one hand, scaling up was very simple. The AutoScaling group (ASG) would handle any scaling events for non-seed nodes. Remember, Seed Nodes must remain static to maintain the integrity of the cluster. Mission learned this the hard way. At first, Mission had all SF nodes in the same ASG. But, if the ASG removed one of the Seed Nodes the cluster was destroyed. So, Seed Nodes had to be separated from our ASG, but moving forward, putting the seed nodes into their own ASG with a set policy for recovering Amazon EBS volumes from recent snapshots would be ideal.
Now, scaling up non-seed nodes and adding them to the SF cluster proved fairly trivial. Essentially, if the capacity of the ASG increases, the new Amazon EC2 instance will execute a PowerShell script via the UserData to install Service Fabric and join the cluster.
Scaling down, however, proved much more difficult. Theoretically, the ASG could simply terminate non-seed nodes as needed, but the problem is this leaves “zombie” nodes that are still listed on the cluster but in the “down” state which will wreak havoc on the cluster’s performance. Mission needed a way for the infrastructure to interact with the Service Fabric cluster. Whenever the Infrastructure designated a non-seed node for removal, Mission had to make sure that Service Fabric could gracefully disable the node, perform its cleanup operations, and remove the node from the cluster before the instance could be terminated.
From an infrastructure perspective this is simple: The ASG utilizes lifecycle hooks to perform cleanup operations prior to terminating an instance. This can be an AWS lambda function, bash script, etc. The challenge here was figuring out how to get AWS lambda or some intermediary to execute our Service Fabric cleanup tasks. Now, prior to this Mission had validated a tool called SFCTL. This is a simple python based CLI program that can run on any linux host. In fact, this is the tool Customer X’s DevOps team currently utilizes. Mission tried installing this as a package on AWS lambda, but Mission couldn’t get the packages to validate or run properly. It is also possible to interact with ServiceFabric using an SDK for PowerShell. Mission tried running this package in AWS lambda as well, but ran into the same compatibility issues with PowerShell versions supported in AWS lambda. In the end, Mission found that the simplest method to interact with Service Fabric was via a REST API Endpoint which was very well documented.
From there Mission simply looked up the methods for DisableNode and RemoveNode then used a lambda python function to build url strings for use with the requests python package. The logic of the function went like so:
1) Retrieve the instance’s nodename tag from the downscaling event
2) Query Service Fabric via API for the status of that nodename
3) Attempt to disable the node gracefully
4) Remove the node from the cluster
5) Stop the instance
6) Notify the ASG that tasks have been performed with CompleteLifeCycleHook.
Once the AWS lambda function successfully finished the ASG would then terminate the instance.
CI/CD
Customer X had a very well-defined CI/CD pipeline utilizing Microsoft Azure DevOps. As much as possible they wanted to retain this process for their developers, because creating an entire new pipeline is a considerable task.
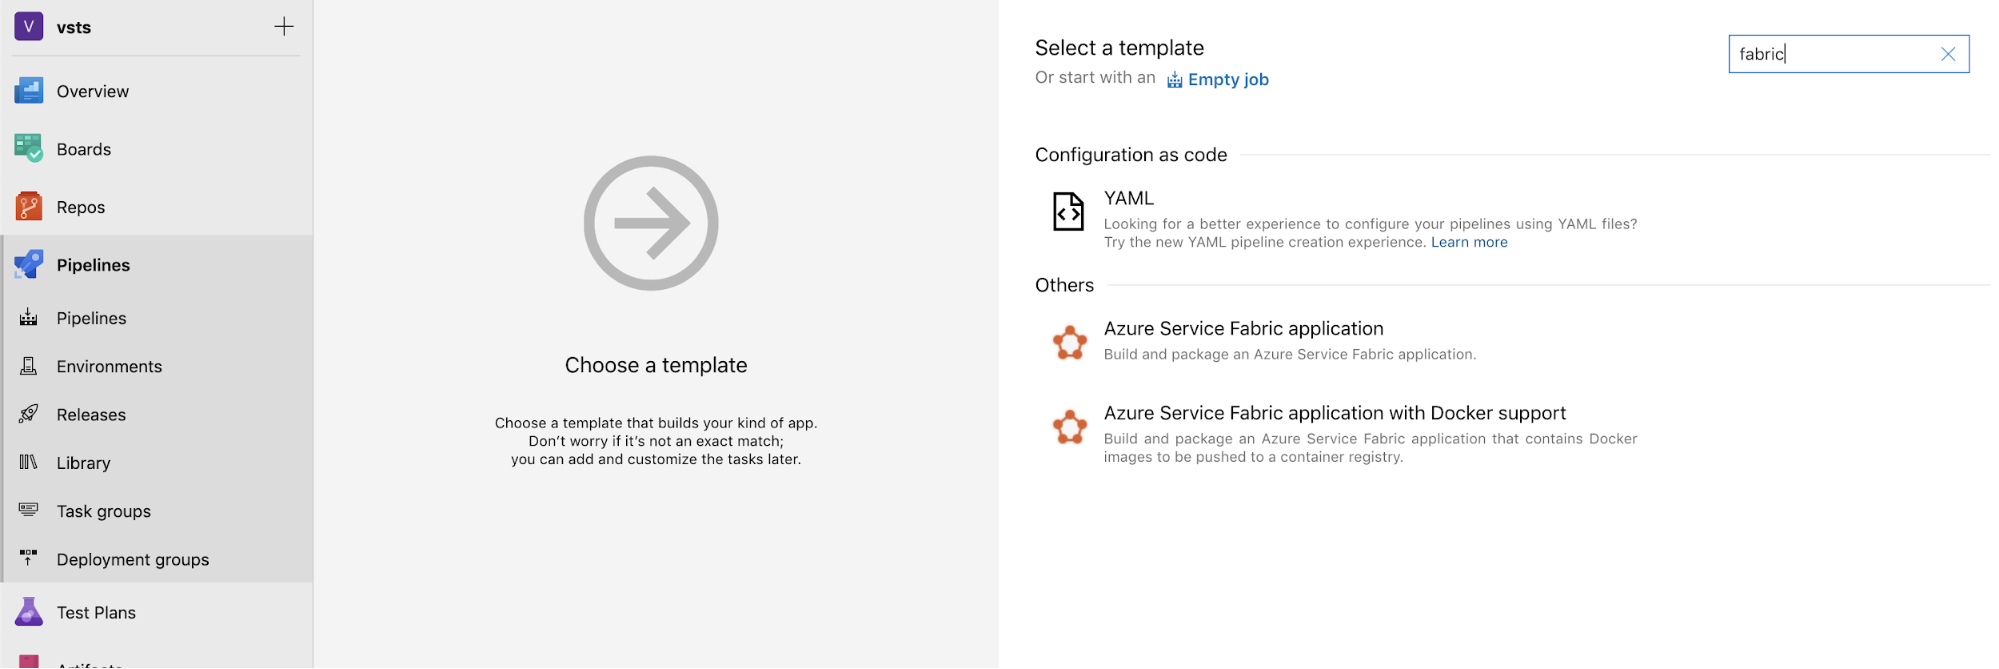
Azure DevOps provides, among others, a VisualStudio development environment. In short, developers can push their code to a repository. Any commits will be picked up by the pipeline which will then create a Visual Studio environment, presumably in a disposable virtual machine, attempt to build its artifacts then deploy them to a Service Fabric cluster over port 19000. Mission first attempted to create a new pipeline completely from scratch and quickly learned why Customer X was so adamant about retaining their current pipeline. After much investigation, Mission found that there is a hidden option and documentation for a blueprint specifically designed for deploying code to a Service Fabric cluster.
Once Mission got the blueprint up and running it was a simple matter of designating a cluster endpoint in Azure DevOps using the DNS of our Network Load Balancer and opening up port 19000 on our Amazon EC2 instances. Now, given that this was only a POC, wide open access to the management port was necessary. However, for security purposes in a true environment one would likely want to implement security measures such as a NACL/Security Group to restrict traffic only to Microsoft’s public IPs. Additionally, there did appear to be support for certificates, but this was beyond the scope of our project.
Enter the Simulation
After vetting a number of streaming data solutions Mission settled on Amazon’s Managed Kafka as a Service MSK. Customer X had extremely strict requirements for data ingestion including 100ms or less end-to-end processing and p99 under 10ms. Amazon Kinesis was quickly eliminated as our testing showed that end-to-end processing would be in excess of 200ms.
Standing up an Amazon MSK cluster is relatively simple, which was a benefit for Customer X. Now Mission needed to put that cluster through its paces. This was easily the most difficult challenge of the project. Our first ingestion implementation included a simple python script to generate messages based on scrubbed data provided by Customer X, then publish these messages to IoT Core gateway with a topic and rule that would send those messages to a lambda function which would in turn publish those methods to Kafka. The benefit of this implementation is that at every step of the process Mission could intervene with code to append a timestamp onto the message data and see exactly how long each leg of the journey took. In the end, Mission simply could not hit Customer X’s requirement of 5,000 messages per second using this implementation. Mission attempted every customization within AWS lambda and AWS IoT core over a period of weeks. Mission tried increasing the provisioned concurrency, provisioning the AWS lambda within the same VPC, refactoring our simulator code. No matter what we did we still saw heavy amounts of throttling in Amazon CloudWatch.

Finally, in desperation, Mission refactored our simulator once again to write directly to Kafka, randomize the data for speed (simple key value stores in the same format as Customer X’s data), implemented multi-threading, and ran the simulator script on a fleet of memory optimized, non-burstable networking Amazon EC2 instances. This finally got us over the 5,000 message per second requirement. But why stop there? On a single host, the simulator could finally deliver multi-thousand messages per second, end-to-end, however, there were errors concerning too many linux users accessing the message data file. Mission increased the limit with the ulimit command. This still resulted in another hard ceiling of around 7,000 messages per second.
Through sheer trial and error Mission found that the actual source of the bottleneck was a session limit. The root cause is still unclear, but we found that if we ran our simulator script in a separate SSH session, either through the terminal or an SSM Session Manager, we could run vastly more threads without errors. Now we were seeing increases of multiple tens of thousands of messages per second. Mission just needed a way to automate that process. To do so, we downloaded the pdsh tool and created a host file containing ten elastic IPs and connection strings to our simulator fleet. Mission ran the pdsh command with the simulator script. Eventually, we got as high seventy-three thousand messages per second and the Amazon MSK cluster performed wonderfully. The Amazon MSK cluster processed the messages in 1ms or less 99.6% of the time (end-to-end latency from the simulator to the Kafka consumer) and barely hit 17% CPU utilization. Customer X was elated by the results and so were we.
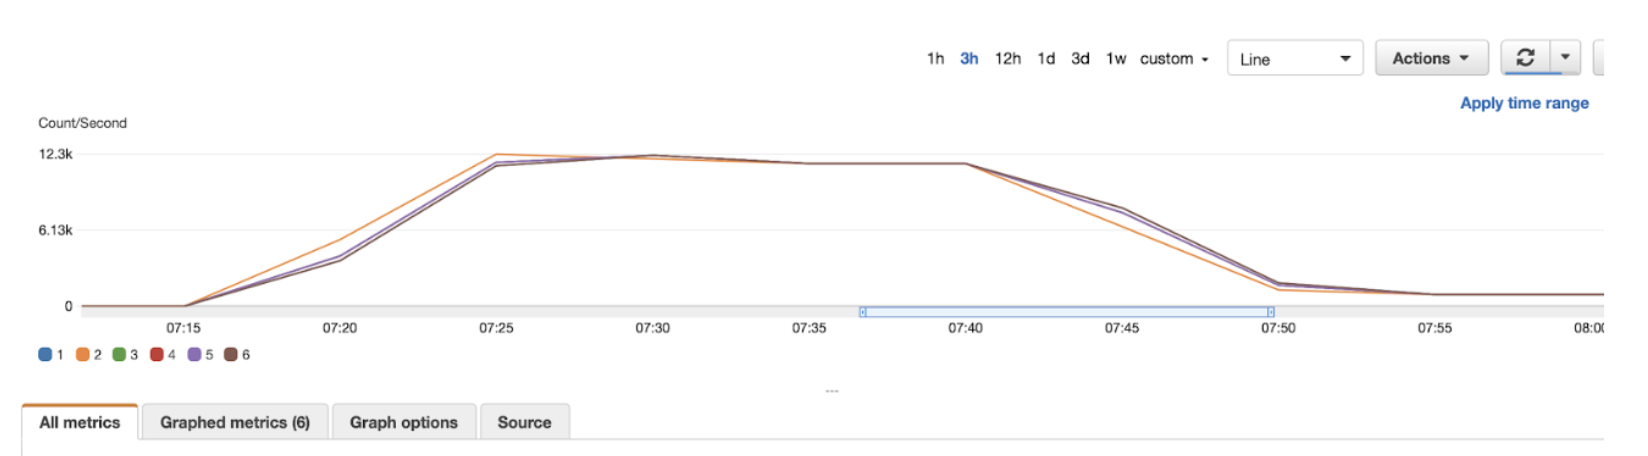
12.3k x 6 Kafka brokers = 73,800 Messages Per Second