A guide to getting started with SageMaker Studio on AWS
Amazon SageMaker Series - Article 3
We are authoring a series of articles to feature the end-to-end process of data preparation to model training, deployment, pipeline building, and monitoring using the Amazon SageMaker Pipeline. This third article of the Amazon SageMaker series focuses on how to get started in using Amazon SageMaker. It covers key concepts in SageMaker, like how to set up SageMaker Studio, install dependencies, shut down instances, and common troubleshooting tips.
Amazon SageMaker is the core of many Machine Learning (ML) and MLops workflows built on AWS. It is a fully managed machine learning service. Data scientists and developers can use SageMaker to quickly and easily build and train machine learning models and then directly deploy them into a production-ready environment. Amazon SageMaker Studio provides a web-based integrated development environment (IDE) where you can see and interact with all your ML workflows in SageMaker.
In this blog post, we will introduce you to SageMaker Studio and show you how to get started.
Contents:
Why should you use SageMaker Studio?
SageMaker Studio Concepts
Setting up and accessing SageMaker Studio
Setting up SageMaker Studio for the First Time
• Accessing SageMaker Studio
• Configuring your Studio Environment
• Creating a Jupyter notebook
• Selecting instance types
• Accessing the terminal
• Installing dependencies
• Shutting down instances
• Sharing notebooks
Common Troubleshooting Tips
• Accessing data in S3
• IAM Permissions
• SageMaker SDK version management
• Utilizing AWS Support
Additional Resources and Further Reading
• General Reference Links
• Video Walkthrough
• Further Reading
• Advanced SageMaker Studio Features
Why should you use SageMaker Studio?
Amazon SageMaker Studio provides an integrated development environment (IDE), giving developers and researchers each their own working environment with elastic compute through a web-based interface. It is a single platform to manage end-to-end machine learning processes, including everything from training your model, to tuning, debugging, deploying, and monitoring it. SageMaker studio provides a workspace for users with hosted Jupyter notebooks and flexible compute resources. It also adds a visual interface for many advanced SageMaker features such as data wrangler, feature store, pipeline, model registry, and so on.
SageMaker Studio has made some instance types available as “fast launch”. These instance types are designed to launch in under 2 minutes, reducing the amount of time users wait to provision new notebook and compute instances. This also allows users to quickly test code or change compute resources.
Studio also offers some advanced features which can help your organization save time and money. Some of these features include a way to share Jupyter notebooks with environment context/information, customizable lifecycle policies to automatically shut-down inactive instances, native Git repository integration, and more.
SageMaker Studio Concepts
SageMaker Studio is made up of the following components:
- Domain - You can have one domain per region per AWS account. It consists of an Amazon EFS volume, list of users, and security and networking configurations for resources inside the domain. Notebooks and files can be shared within the same Domain.
- User Profile - Each user should have their own user profile within the Domain. It is created when a user is onboarded to the domain.
- App - Containerized applications which support reading or running jupyter notebooks, terminals or consoles. There are two main apps in Studio:
• JupyterServer - Corresponds to a specific user profile. This app hosts the Jupyter Notebook server. When a user connects to SageMaker studio, this is the application that is serving the UI.
• KernelGateway - Corresponds to a running SageMaker image container. For example, when a user starts a notebook a KernelGateway application will be created on a separate host. When the notebook runs, any compute is done in this application on the remote host. A user can have multiple KernelGateway apps running, and can specify the underlying instance type.
You can find a deep dive of how SageMaker Studio architecture works in the following blog post form AWS: Dive deep into Amazon SageMaker Studio Notebooks architecture.
Setting up and accessing SageMaker Studio
Setting up SageMaker Studio for the First Time
The following steps need to be taken when creating and/or accessing SageMaker Studio for the first time. You can find more information in the AWS documentation here.
There are two ways you can create a Domain in the AWS console: “Quick Setup” (default setup) or “Standard Setup.” The “Quick Setup” option will use the default options for domain setup including sharable notebooks, and public internet access, that is what we will use here. If you require more fine-grained control over access or networking configurations, you should use “Standard Setup” procedures instead where you can customize the configuration on a more granular level.
Additionally, there are two options for how your Studio users will access their workspaces. We will be using Identity Access Management (IAM) to manage users, and users will access SageMaker Studio using the AWS console. AWS also provides an option to sign in directly to SageMaker studio with “AWS IAM Identity Center” which utilizes AWS Organizations to manage users. For further information refer to the documentation linked above.
Setup Steps:
- Navigate to “SageMaker” in the AWS console. In the menu on the left side of the page select “Control Panel”. There will be a page saying “Setup SageMaker Domain”, select “Quick Setup”.
- The first section is for “User Profile”. This will be the first user in the Domain we are setting up. Fill in a name for the user, or keep the default name.
- Next you select (or create) the IAM role that is associated with this user’s profile. If you would like to use an existing IAM role you can select it here (the role must have a trust policy that grants SageMaker permission to assume). Otherwise, you can create a new IAM role from this screen. Here, select the S3 buckets you wish the role to have access to. The resulting IAM role will have the AWS-managed “AmazonSageMakerFullAccess” role attached as well as a policy granting permissions to the S3 buckets you specified.
- The next step is selecting the VPC and subnets for SageMaker studio. You should select 3 subnets each in different availability zones (AZs) to maintain high availability to users.
- Select “Save and Continue”.
- It will take several minutes to create and initialize the domain.
- To add additional users, on the “Control Panel” page, navigate to “Users” section and select the “Add user” button in the top right. This will bring up a window where you will select a name for the user, and assign or create an IAM role to associate with the user profile. Note: there is no cost associated with adding more users. You are billed only for compute and storage resources used.
Accessing SageMaker Studio
Below shows steps about how to access SageMaker studio.
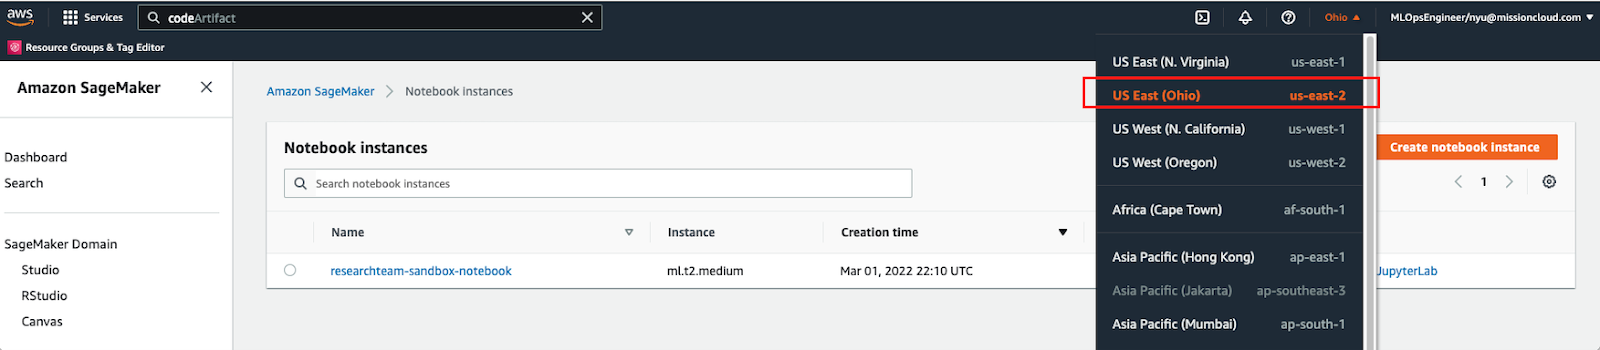
- Once you are logged in to the AWS account, use the landing page or the search bar at the top of the page to search for ‘SageMaker’.
- On the top right, make sure you are in the same region as the domain and user created above, such as ‘us-east-1’ or ‘us-east-2’.
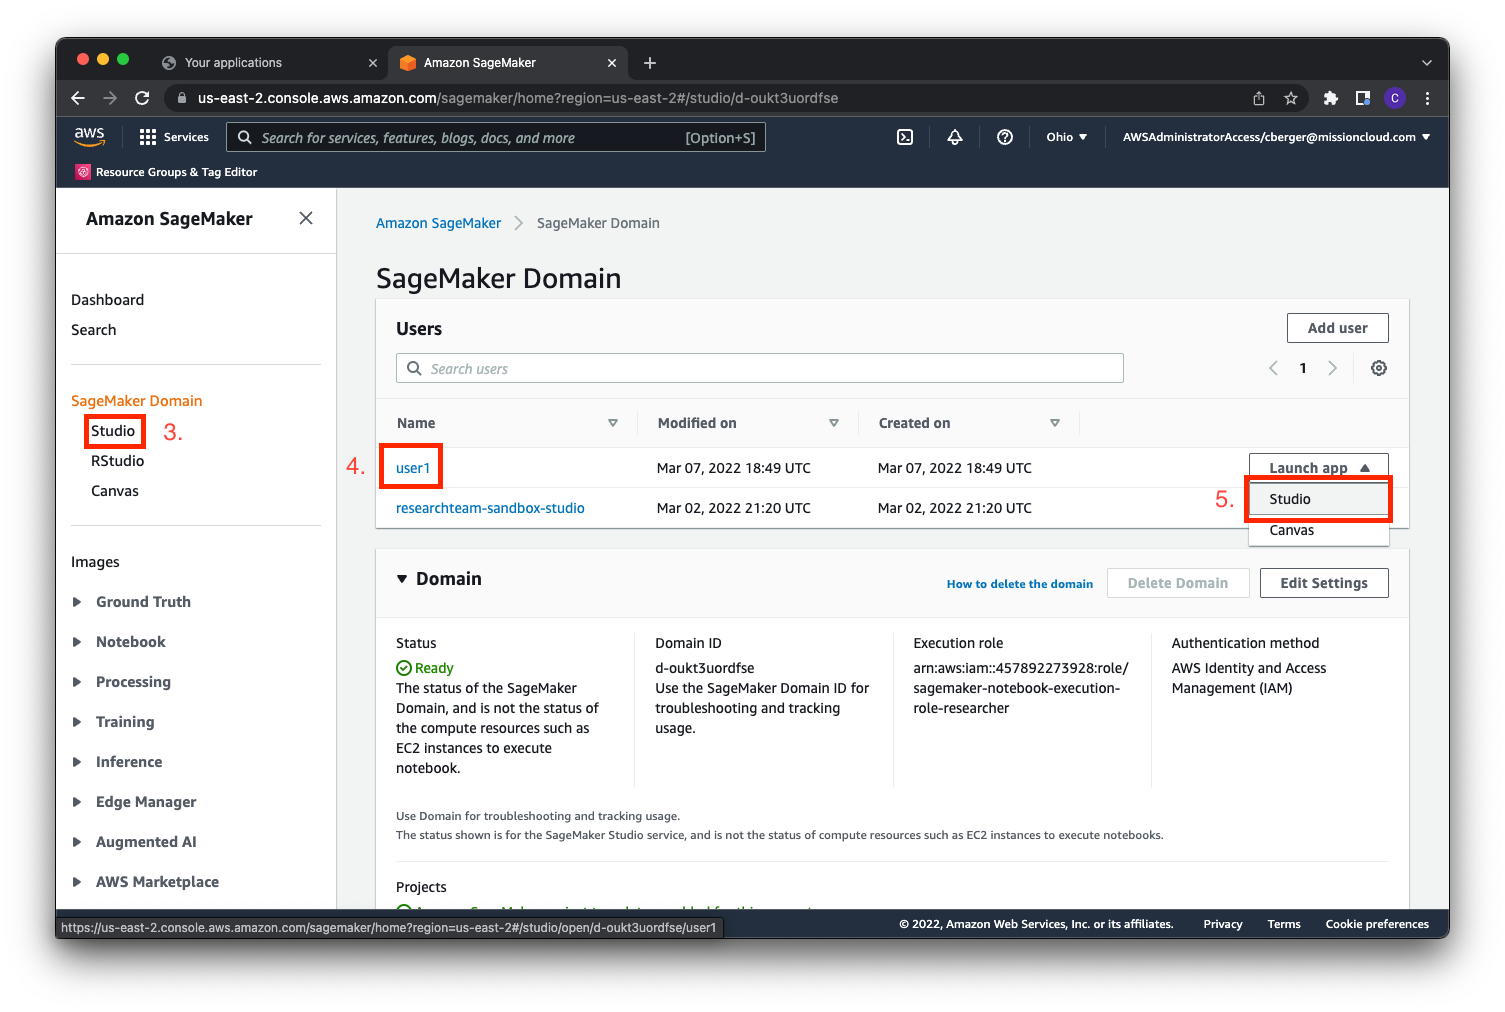
- On the left side of the screen select Studio.
- Find the user that you created above.
- To the right select ‘Launch app’, then select ‘Studio’.
Configuring your Studio Environment
Creating a Jupyter notebook
There are three different ways to start a new notebook once you have landed in the SageMaker Studio console.
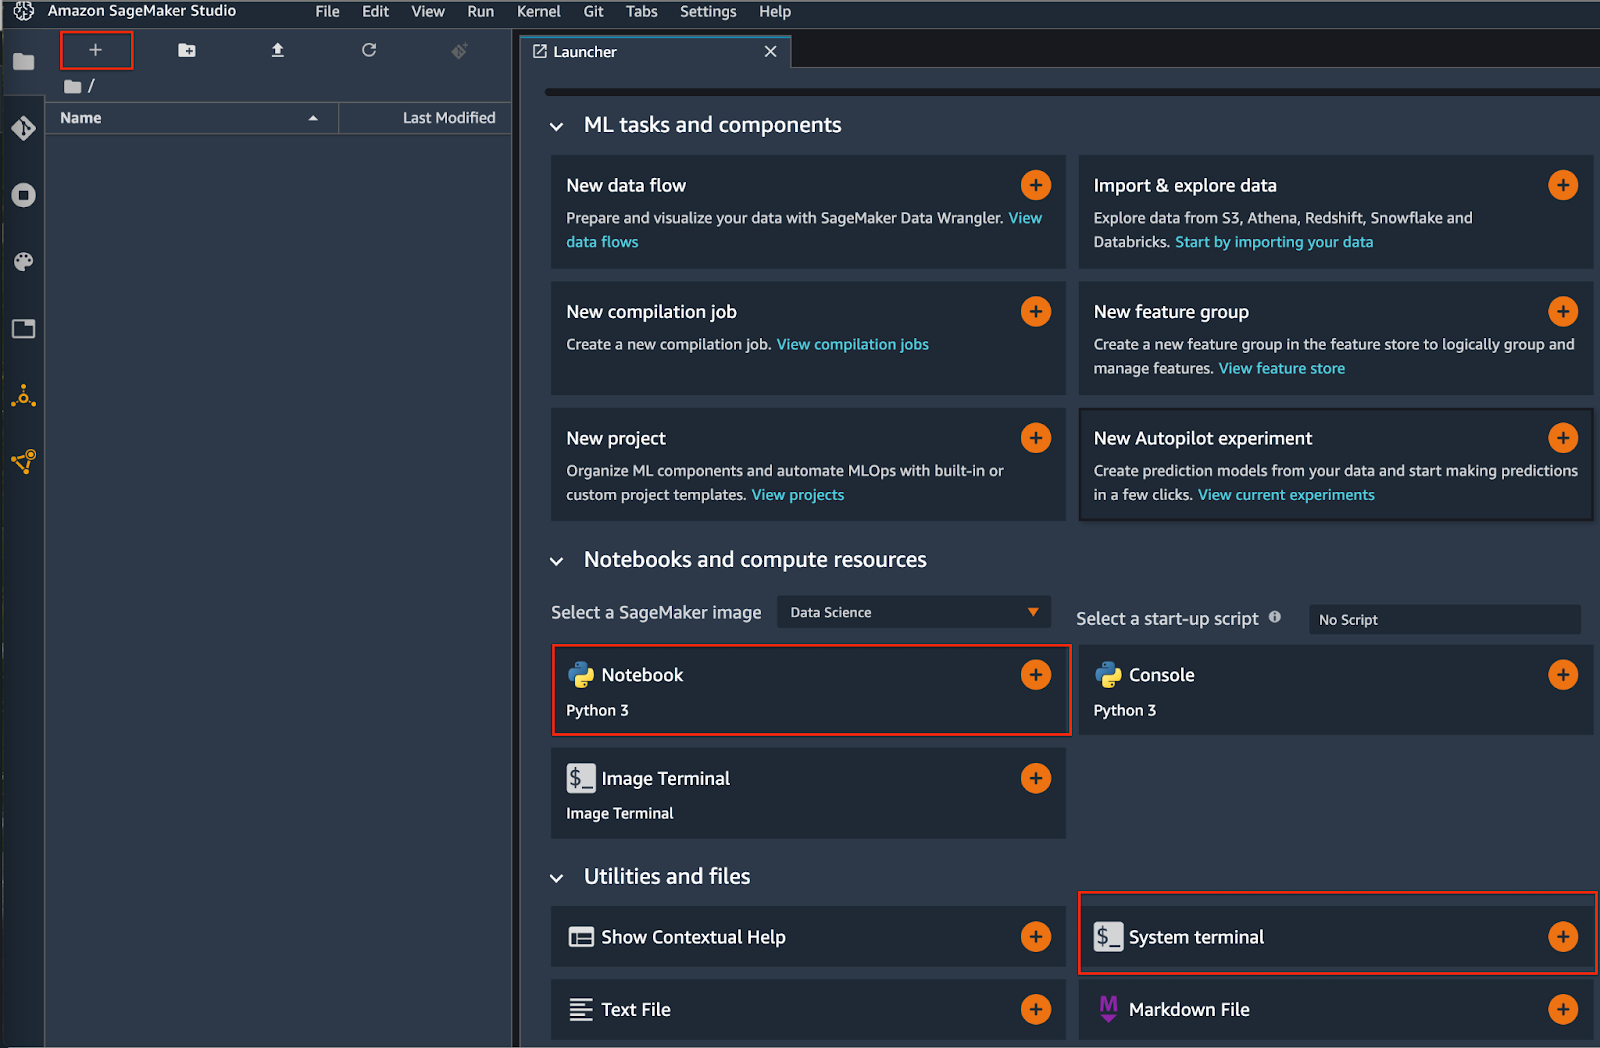
Option 1: click the “plus” sign in the top left. This will open a “Launcher” window, shown on the right. Here you can select to start a new notebook or open a terminal.
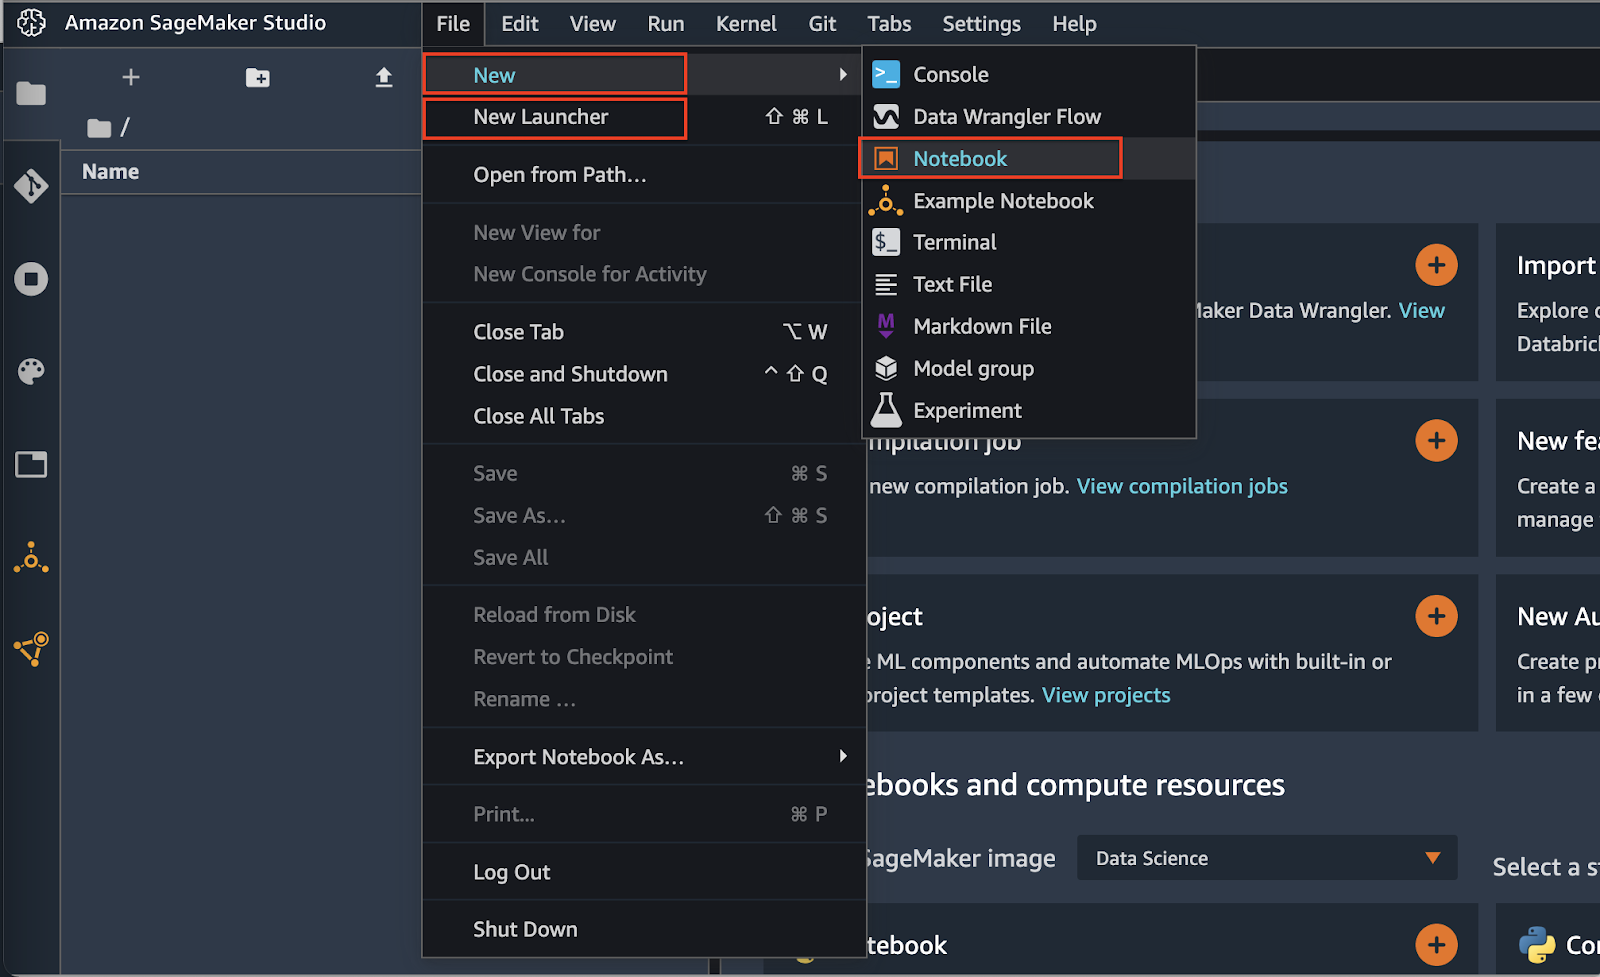
Option 2: At the top of the screen, click the dropdown menu for “File” and choose “New” then, you can select the kind of tile you want to create. Here, select notebook. You can also select “New Launcher,” which will lead you to the same page as above in Option 1.
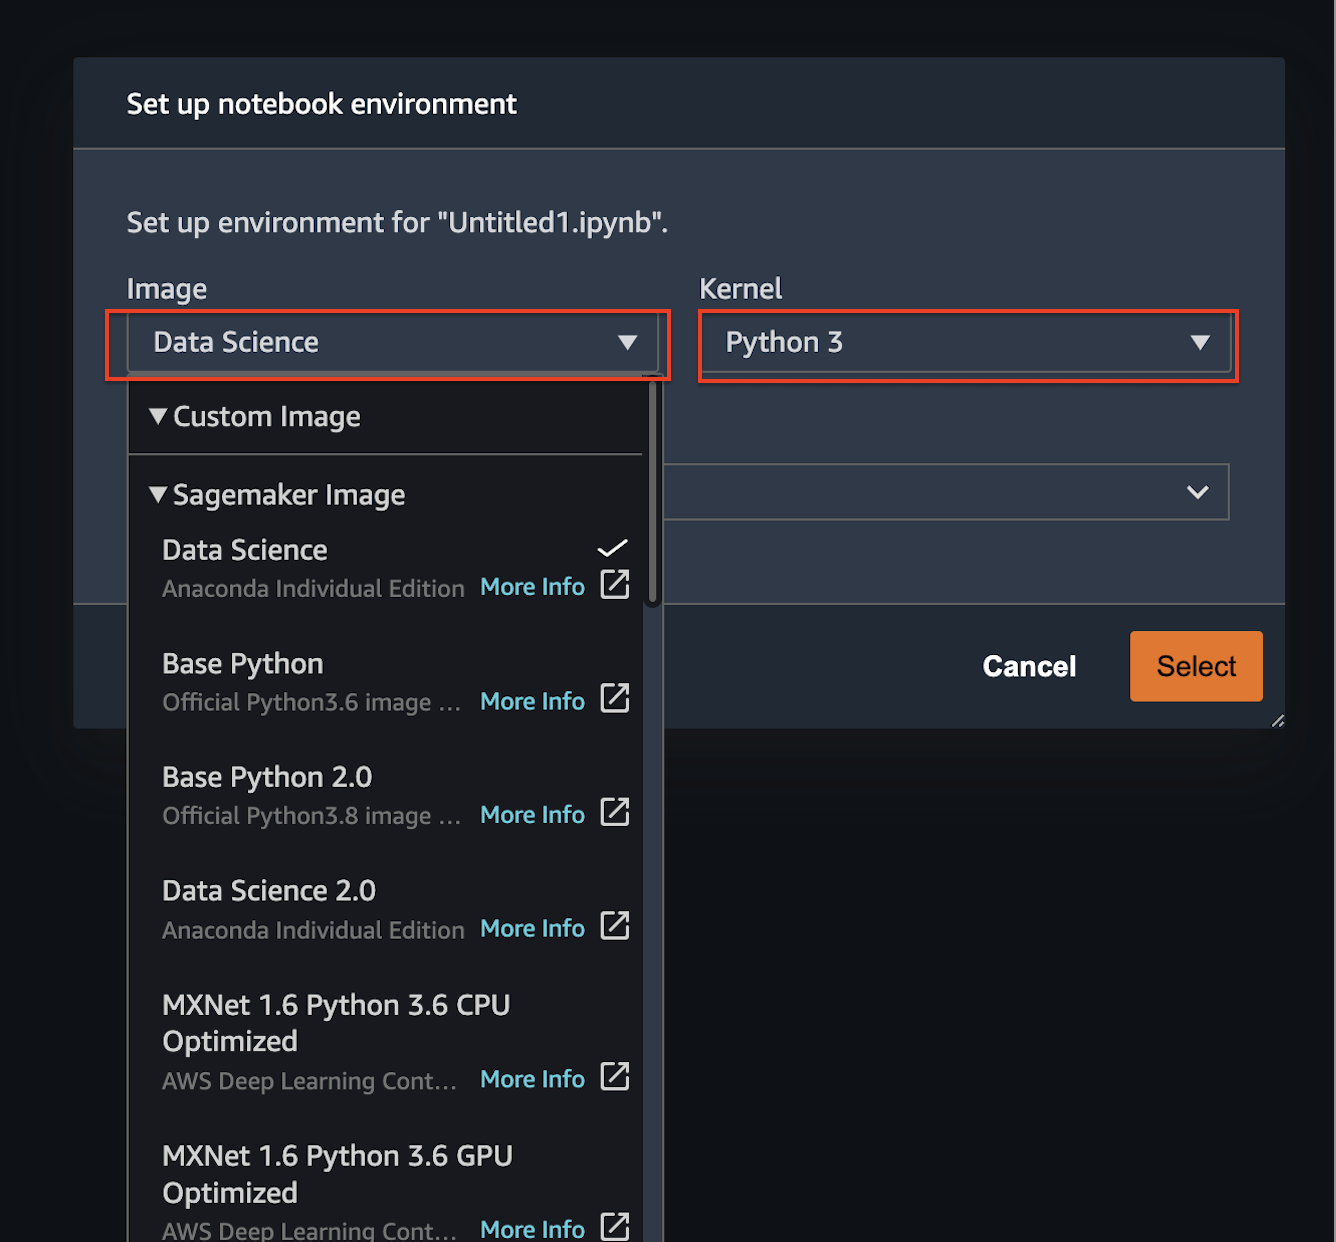
When a user launches a notebook for the first time, a window will pop out to ask you to set up the image and kernel, as shown below. On the dropdown menu for “Image” there is a list of various built-in images provided by AWS, such as the default “Data Science” image (commonly used for general data science and modeling purposes, it contains common packages such as pandas and sklearn). There is also the option to bring your own image, you can find instructions on how to do so here in the AWS documentation.
Additional information about SageMaker Studio notebooks and how they work can be found in the AWS documentation here.
Selecting instance types
When you open a notebook, an instance is automatically created to host that notebook. You can customize the type of instance that your notebook is running on from the Studio Console.
To change the instance type, click on this section in the top right corner.

From here you can select the instance type.
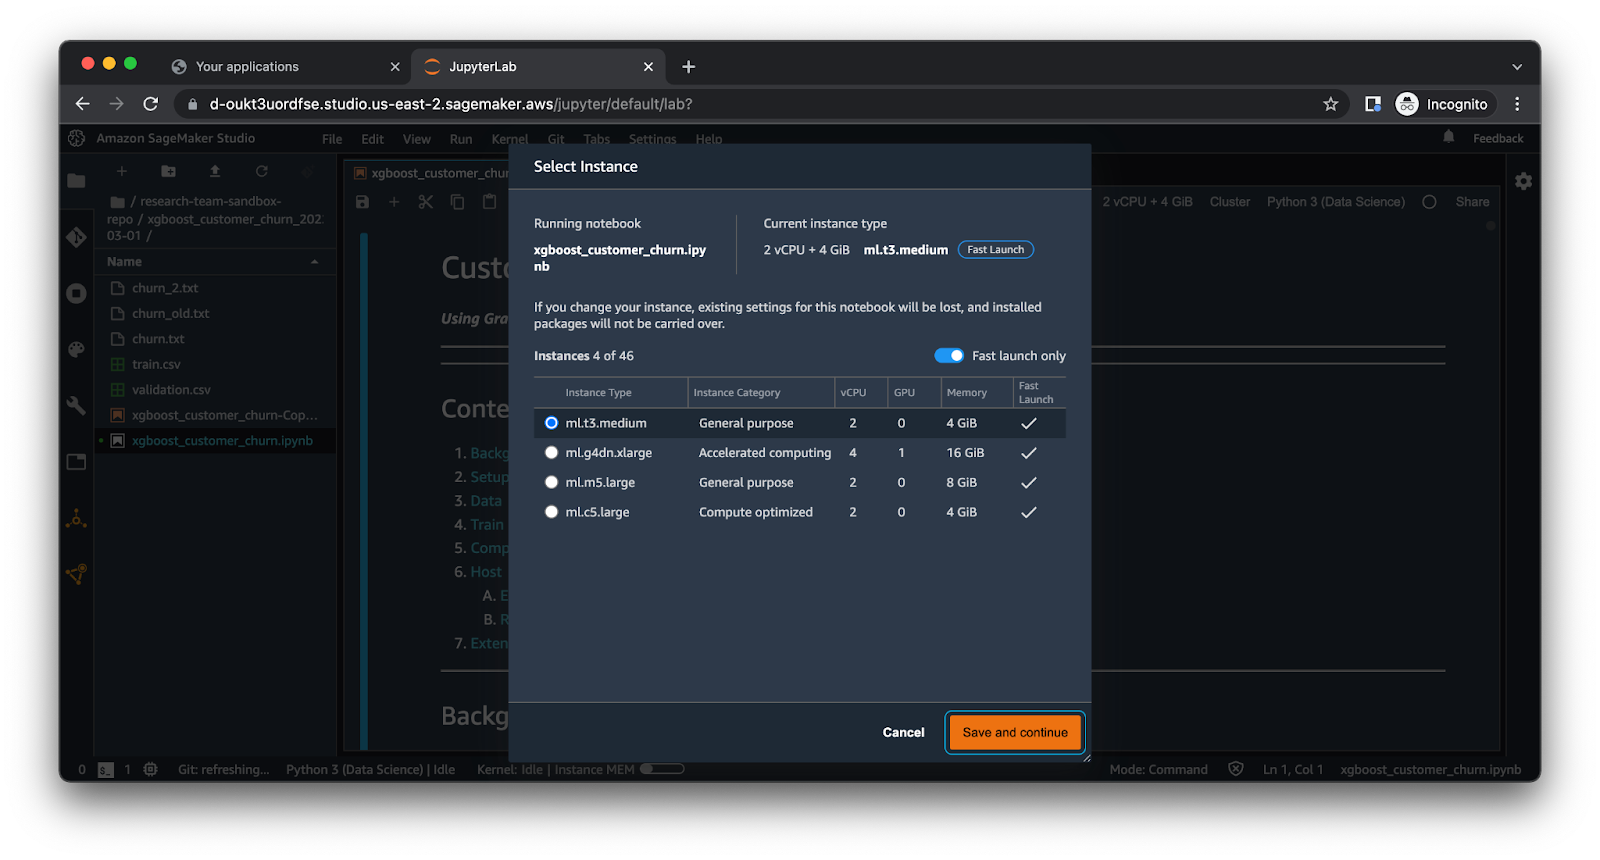
There are two types of instances available, fast launch and standard. Fast launch instances are designed to be ready within 2 minutes, which is an advantage of using Studio over traditional notebook instances. However, only some instance types are available as “fast launch”. If you would like to use larger or more specialized instance types, set the ‘Fast launch only’ switch to ‘off’ then select the instance type you wish to use. It will take several minutes to launch on the new instance and set up the kernel.
More information about available instance types and prices can be found here.
Accessing the terminal
Notebook instances run inside of containers, which are isolated environments. As such, you may need access to different terminals depending on what you are doing. This AWS blog article gives a deep dive of SageMaker Studio’s underlying compute architecture; here you can see why there is more than one terminal, and why you may need to access each for different purposes.
- Notebook instance terminal - Open the image terminal on the same instance, and in the same application as a current running notebook. This allows you to use the image terminal for this existing running notebook.
- System terminal - Opens a bash shell in the root folder for the user in the JupyterServer App. This is the best place to do things that apply to the entire working environment such as Git operations, downloading files, etc. To launch, open the quick-launch screen, then under “Utilities and files” select “System terminal”
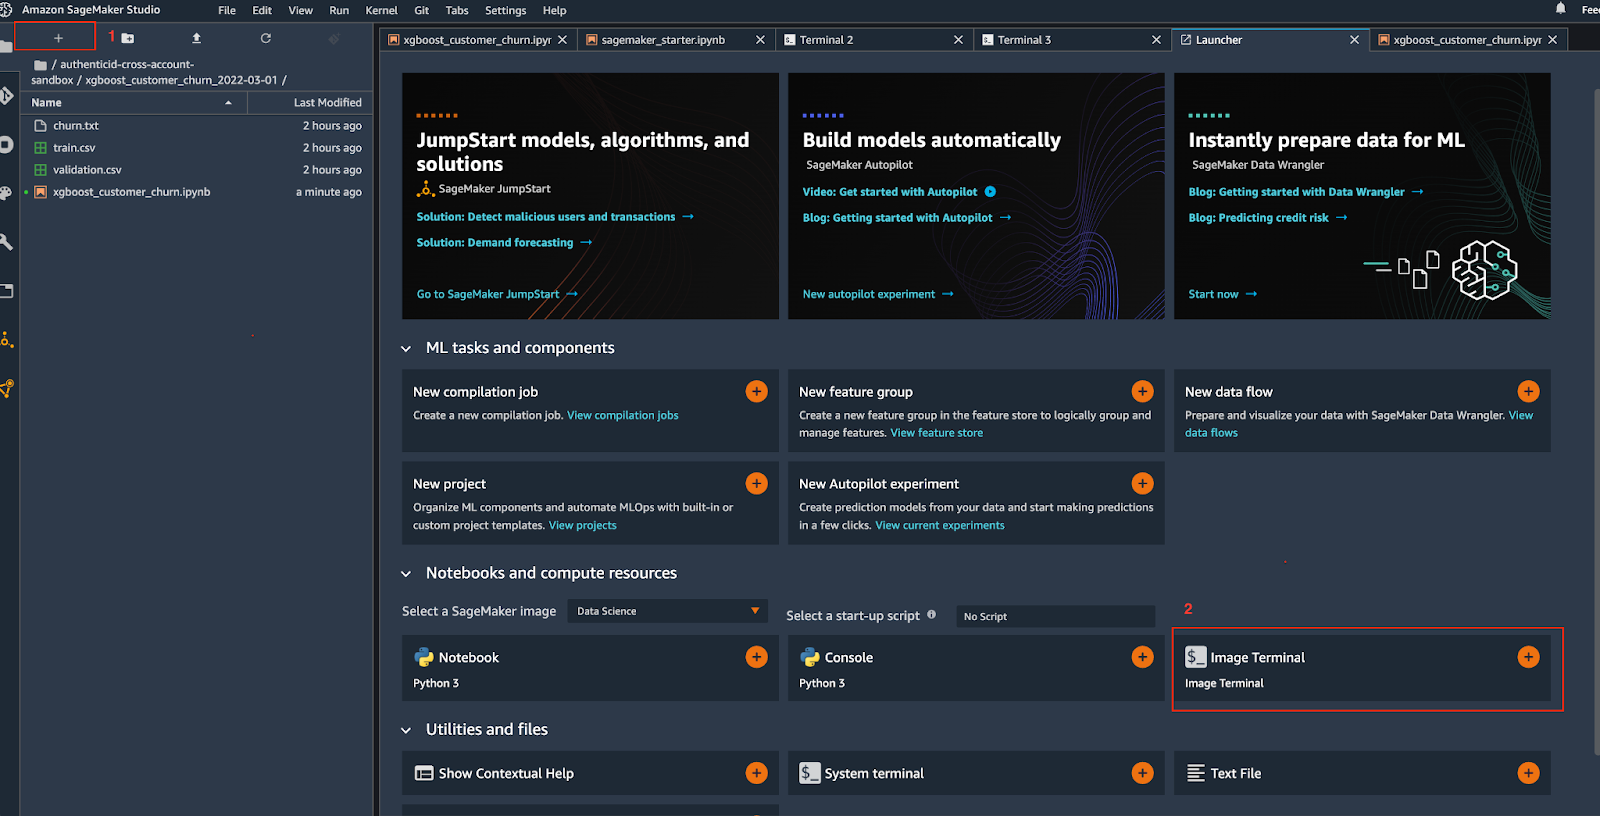
- Image terminal - Creates a new running container application with the specified SageMaker image and connects you to the terminal. Here you can run scripts in a new container application without using the visual interface of a Jupyter Notebook.
Installing dependencies
There are several ways to install dependencies for your projects.
- Directly from your notebook - In a cell if you start the line with an exclamation point it will run it as a command line. This may need to be re-run when you change instance types, or when you shut down/restart your notebook instance.

Alternatively, you can use python’s os package to run the command:
import os
os.command('pip install my_package_name')
You can also specify a requirements.txt file and install all dependencies at once using:
os.command('pip install -r ./requirements.txt')
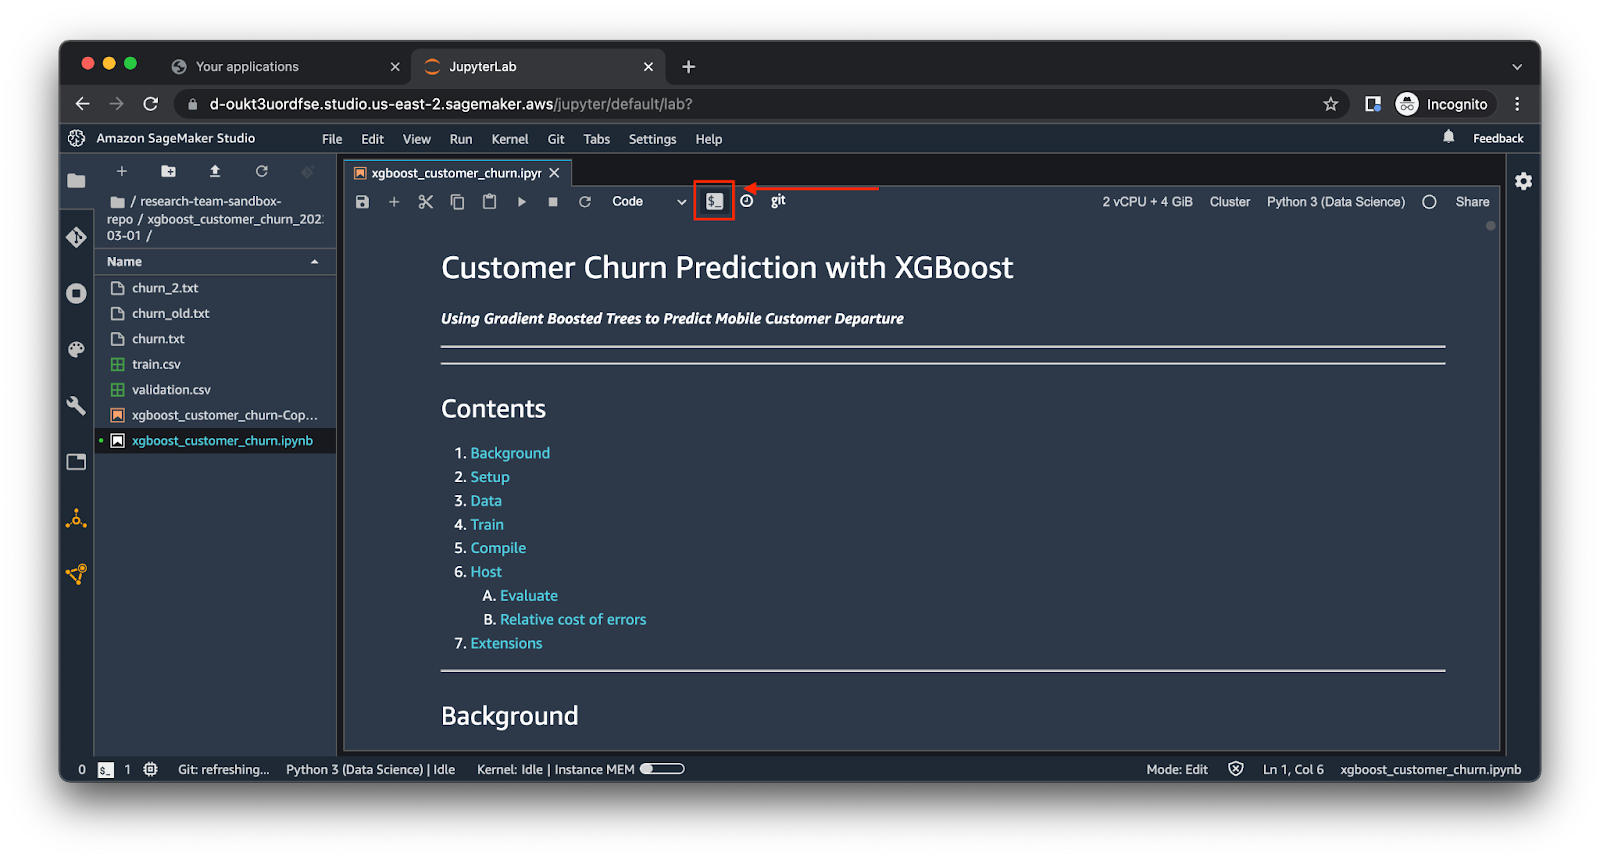
- From a terminal/command line - You can open a terminal within the instance that your notebook is running on using this button. You can then install any packages or dependencies here. Again, this will need to be re-run any time that you change instance types, or when you shut down/restart your notebook instance.
- Using a SageMaker custom image container - This option is more involved, but the result is that the dependencies are already installed when you open your notebook. By creating a custom image, you can specify kernels, language packages, and other files that are required to run a notebook in Studio. Instructions can be found in the AWS documentation here.
- Install packages using a start-up script through lifecycle configuration - Lifecycle configurations are shell scripts which can be triggered by certain lifecycle events in SageMaker Studio. Starting a studio notebook is one of the lifecycle events which can trigger those scripts. When starting a new notebook instance, you can select a start-up script using this method. This allows you to install packages using a shell script without needing to create a custom image. This AWS blog post walks through the process of creating and updating lifecycle configurations, particularly for this use case.
Lifecycle configuration can also be used to do things like automatically shutting down inactive instances, see “Shutting down instances” section below.
Shutting down instances
Notebooks and terminals will continue to run until you turn them off. It is best practice to turn off your instances when you are not using them in order to save costs.
On the left side of the Studio interface there is a tab where you can see everything that is running in your Studio environment. Use this screen to turn off resources you are not using. As long as you have saved your notebook instance, data will be saved and stored for your next session.
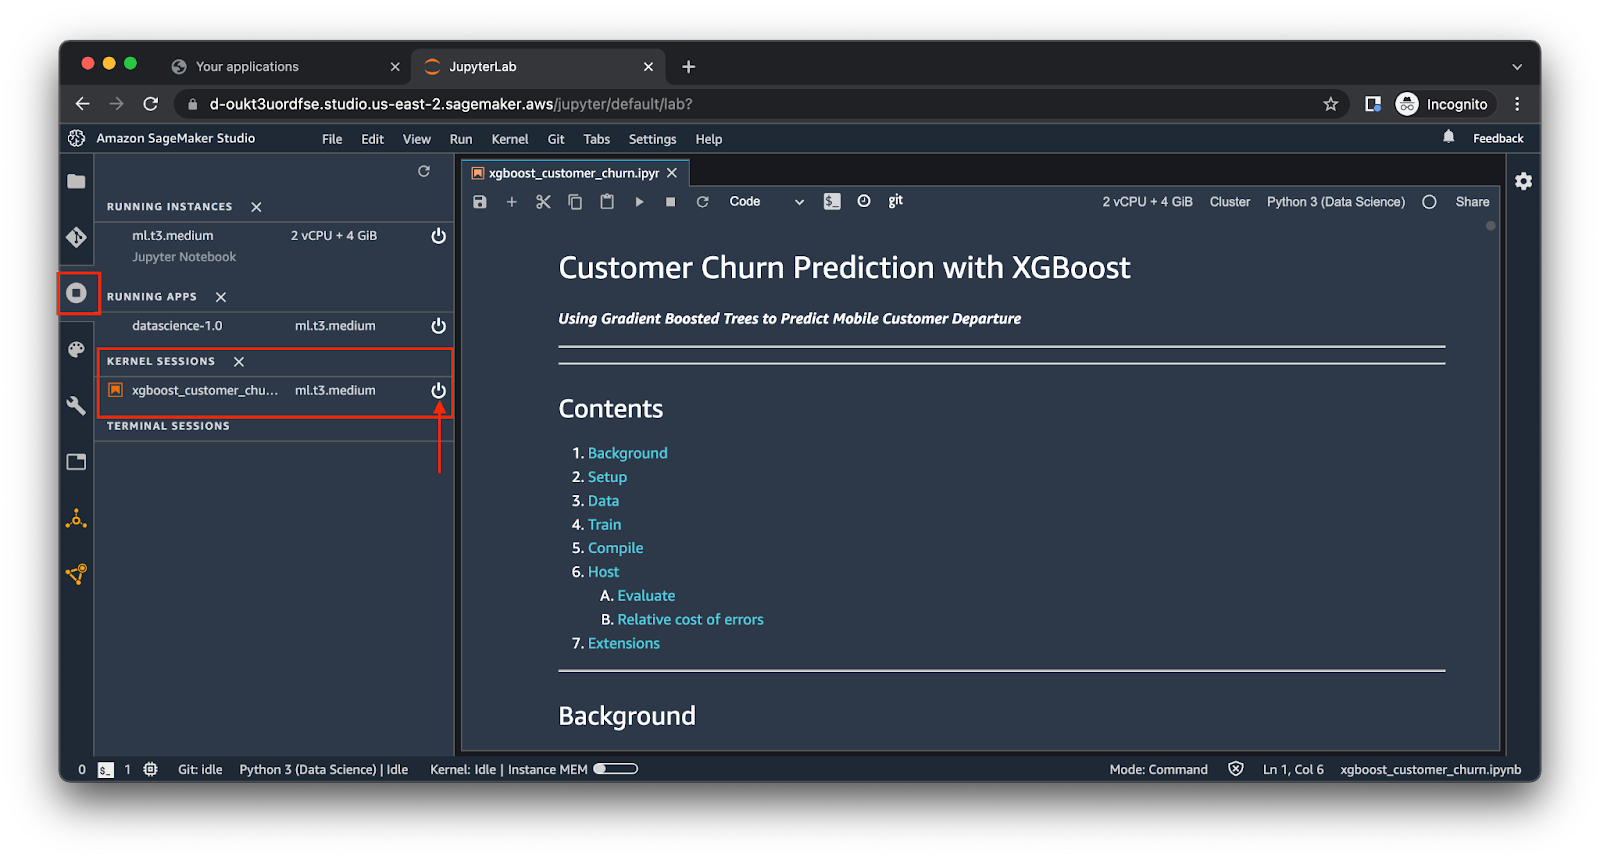
Notebook kernels and terminal sessions run inside of a container application which you can see in the ‘Running Apps’ section. These apps then run on an instance, which you can see in the top ‘Running Instances’ section. Shutting down the instance will shut down all running apps and any notebooks or terminal sessions running in this application.
It is easy to forget to turn off your running notebook instances and other applications. In order to save costs, it is best practice to use Lifecycle Configurations to set auto-shutdown policy when instances are inactive. For example, you can set a time out of 2 hours so the notebook will automatically shut down within 2 hours of no activities. This AWS blog post also walks through how to configure a lifecycle policy to shutdown inactive instances.
Sharing notebooks
If two users try to use or run the same notebook at the same time, it can cause errors or corrupt files. Additionally, even if you share a notebook with another user, they may be running the notebook in a different environment, and may have problems with installing the correct dependencies. SageMaker Studio provides a way to share notebooks to solve these problems, outlined here. Sharing this way provides access to a read-only copy of the notebook, where dependencies for the notebook are included in the metadata. This way, when a colleague copies the notebook, they can run it in the same environment as the original notebook.
Common Troubleshooting Tips
Accessing data in S3
It is likely that you will be accessing data from S3 from your Jupyter notebooks. Notebooks.
This post on Medium Towards Data Science shows how you can access data from S3 in your SageMaker notebook.
You may need to configure the permissions of the IAM role that your notebook instance is using in order to grant permissions to the S3 bucket and/or file you are trying to access. If you are still having trouble accessing your data in S3, it may be due to configuration of the S3 bucket, see this AWS article on troubleshooting S3 access denied errors.
IAM Permissions
Notebooks launched in SageMaker Studio use the IAM role associated with User in SageMaker Studio by default. If you need to manage permissions for your notebook, such as adding permission to access another service or resource, you can do it by editing or adding a policy for this IAM role. You can learn more about how SageMaker and IAM work here in the AWS documentation.
SageMaker SDK version management
There are ongoing new versions released with new features by AWS as documented on this website. When you encounter SageMaker version issues on a notebook that worked well before, always check the version of your SageMaker that gets imported; if not the version you desired, install the desired version using below code and RESTART the notebook kernel to activate the newly installed version. For example, SageMaker Inference Recommender does not exist in SageMaker Version 2.88.0 but do in Version 2.95.0.
import sagemaker
# to check the version
print(sagemaker.__version__)
# to install desired version
!pip install --upgrade "sagemaker==2.95.0"
# to check the version is as desired
assert sagemaker.__version__ == '2.95.0'
Utilizing AWS Support
If your organization has enterprise support, you can utilize the AWS support resources. By submitting tickets through the AWS support console, you can directly communicate with AWS support engineers who can help troubleshoot or connect you with internal resources. Particularly for newly released services, the AWS Support team may be able to help connect you with their internal product development team to fix bugs or request feature development or improvements.
Conclusion & Additional Resources
With SageMaker Studio's web-based visual interface, you can see and interact with all of your ML workflows and improve the productivity of your data science team. Check out the resources below to learn more.
General Reference Links
- AWS Docs on SageMaker - Developer Guide - AWS’s comprehensive documentation about SageMaker including SageMaker Studio.
- AWS Docs on SageMaker - API reference - All actions in AWS are done through API calls, this is AWS’s documentation for all available API calls for SageMaker.
- SageMaker — Boto3 Docs 1.21.13 documentation - All API calls are also available via the python library Boto3, this is the documentation for this library.
- Amazon SageMaker Python SDK documentation - Documentation for SageMaker’s python library - higher level of abstraction than Boto3, often used within SageMaker Studio Jupyter notebooks.
- Amazon SageMaker Examples GitHub repository - AWS has created a GitHub repository with many example Jupyter notebooks that demonstrate how to build, train and deploy machine learning models using SageMaker, as well as example notebooks demonstrating more advanced SageMaker features.
Video Walkthrough
- Video: Onboard Quickly to Amazon SageMaker Studio - 20 minute video introduction and walkthrough of SageMaker Studio from AWS’s Youtube channel.
Further Reading
- Amazon SageMaker Best Practices - Mission Blog
- How to Build A Strong Foundation in Amazon SageMaker
- Taking the next step: A data scientists introduction to remote training with Amazon Sagemaker
- How to Use Amazon SageMaker Inference Recommender
Advanced SageMaker Studio Features
- SageMaker Model Registry - Provides a way to register trained models so that they can be easily tracked and deployed. This Medium Article also provides an introduction and information on how to use it.
- SageMaker Model Monitor and SageMaker Debugger - Hhelp you to monitor data and model quality on real time endpoints, and debug models. This video tutorial by Julien Simon shows how you can add SageMaker Model Monitor and Debugger to your python workflow.
- SageMaker Experiments - Organizes trials of your training experiments. Keeps track of the components of your development process including input datasets and parameters, algorithms used, and output metrics, checkpoints, and model artifacts. This video from AWS walks through how to use SageMaker Experiments.
- SageMaker Ground Truth - Suite of tools designed to help with ground truth data labeling. This link has a series of 6 videos by Julien Simon showing how to use different features of Ground Truth.
- Data Wrangler - Feature of SageMaker Studio where you can create workflows to manage datasets including extracting from various sources, transforming, analyzing and exporting. This video shows how to use Data Wrangler.
Feature store - Ingest, store, and serve features for real time inference, batch inference or training jobs; available in both online and offline modes. This video shows how to use feature store
FAQ
- How does SageMaker Studio handle collaboration on projects, especially in terms of version control and simultaneous editing?
Amazon SageMaker Studio enhances project collaboration by supporting version control and enabling team members to edit projects simultaneously. It integrates with tools like Git, allowing users to manage code versions and collaborate effectively without overwriting each other's work.
- What specific security measures does SageMaker Studio implement to protect sensitive data, especially when using shared environments or public datasets?
SageMaker Studio provides robust measures to safeguard sensitive data. It includes features like encryption, network isolation, and controlled access to resources, ensuring that data remains secure, especially in shared environments.
- Can SageMaker Studio be integrated with external data sources or platforms, and if so, what are the steps or requirements for such integrations?
- For integrating external data sources, SageMaker Studio offers flexibility through various AWS services and APIs. Users can connect to external databases, storage systems, and other data platforms, ensuring seamless data flow into their machine-learning projects while maintaining the platform's security and scalability standards.